Table of contents
You’re working in Claude Desktop on your laptop and you’d like it to spin up an IvyForms form for you without switching over to the WordPress admin; that’s what an external MCP client setup gives you. Connecting a client like Claude Desktop, Cursor, or Claude Code lets the assistant call IvyForms tools directly from your machine over MCP. This is the advanced path; if you just want AI help inside the WordPress admin, use Angie instead (Elementor’s free AI agent, which only needs a free Elementor account to log in). This article walks through creating an application password, pointing your client at the IvyForms server, and confirming the connection.
Use this setup when you want to manage IvyForms from an MCP client running on your own computer rather than from the browser. Angie connects automatically through your logged-in admin session, so it needs nothing more than the MCP toggle switched on. An external client lives outside WordPress, so it needs its own credentials and configuration; enabling the toggle on the site prepares the server, but it does not configure Claude, Cursor, or any other client for you.
Have these ready before you begin:
manage_options capability); IvyForms checks this on every request.You create the password from your own WordPress profile, using an administrator account. Go to Users → Profile (your own profile, not Add New User), scroll to Application Passwords, give it a recognizable name like Claude MCP, and click Add New Application Password. Copy the value right away, since it’s shown only once (the spaces in it are fine to keep). Your username for the client config is your WordPress login name from the top of the profile, not the label you gave the password.
An application password is shown only once and grants the same access as your admin login. Copy it somewhere safe, never share it or commit it to a repository, and revoke it from the same screen if it’s ever exposed.
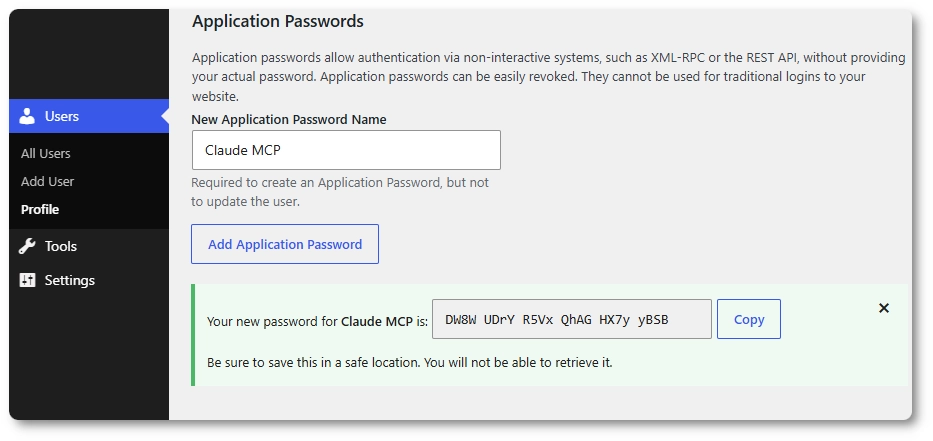
Most clients speak stdio locally while WordPress speaks HTTP, so the connection runs through the @automattic/mcp-wordpress-remote proxy. In every client, point the proxy at the IvyForms-specific endpoint, https://YOUR-SITE/wp-json/mcp/ivyforms-mcp-server, and pass your username and application password as environment variables. Replace YOUR-SITE with your real domain and the credentials with the ones from the previous step.
Add this block to claude_desktop_config.json:
{
"mcpServers": {
"ivyforms": {
"command": "npx",
"args": ["-y", "@automattic/mcp-wordpress-remote@latest"],
"env": {
"WP_API_URL": "https://YOUR-SITE/wp-json/mcp/ivyforms-mcp-server",
"WP_API_USERNAME": "your-wp-login-username",
"WP_API_PASSWORD": "xxxx xxxx xxxx xxxx xxxx xxxx",
"OAUTH_ENABLED": "false"
}
}
}
}
How do I configure Claude Code?
Run this from the command line:
claude mcp add ivyforms \
--env WP_API_URL=https://YOUR-SITE/wp-json/mcp/ivyforms-mcp-server \
--env WP_API_USERNAME=your-wp-login-username \
--env WP_API_PASSWORD='your-application-password' \
--env OAUTH_ENABLED=false \
-- npx -y @automattic/mcp-wordpress-remote@latest
Add the same mcpServers block shown for Claude Desktop under Cursor’s MCP settings (Cursor → Settings → MCP, or a project .cursor/mcp.json file, depending on your setup). The structure matches Claude’s format exactly.
Fully quit and reopen your client so the proxy starts with the new environment variables, then check that the IvyForms server shows as connected and lists its tools. You should see entries like ivyforms-get-forms, ivyforms-create-form, ivyforms-list-templates, and ivyforms-add-form-field. If you want to sanity-check the endpoint itself, open https://YOUR-SITE/wp-json/mcp/ivyforms-mcp-server in a browser while logged in as admin; a 404 means MCP is still disabled, while a 401 or 403 is normal and just means the route exists (a real session uses a POST with JSON-RPC, not a plain browser visit).
Once connected, you ask in plain language, for example “create a contact form from the contact template in IvyForms,” and the agent chains the tools for you. It typically calls ivyforms-list-templates to find valid template IDs, then ivyforms-create-form (an optional templateId defaults to blank_form), which returns a form ID, an admin link, and a confirmation message. From there it can follow up in the same session with ivyforms-update-form-settings, ivyforms-add-form-field, or ivyforms-open-form-builder. The new form shows up under IvyForms in the admin exactly as if you’d built it yourself, and you can open the builder straight from the returned admin link.
An empty tool list or a server error almost always comes down to one of these:
/mcp/ivyforms-mcp-server, not just /wp-json/.