Limited time discount
Spring Deals Are in Full Bloom
Up to 70%Off
Up to 70%Off
Grab Now
documentation-logo
Menu
  • Guides
  • Form Management
  • General fields

How does the Rating field work in IvyForms

ON THIS PAGE

The Rating field allows you to collect quick feedback from users using visual rating icons such as stars, hearts, or likes. Instead of typing an answer, users simply select a rating level that represents their experience.

This field is commonly used in feedback forms, surveys, and post-interaction evaluations where you want users to respond quickly and intuitively.

Rating field settings panel in IvyForms showing label, option list, and rating values

Where can I find the Rating field in IvyForms?

You can add the Rating field from the General fields section in the IvyForms builder. When you expand this panel, you will see the Rating field listed alongside other input types.

Click it to insert it into your form, then select the field in the preview to open its configuration options.

What settings can I configure for the Rating field?

After adding the Rating field, selecting it in the preview switches the sidebar to the Options view. Settings are organized into three tabs: General, Advanced, and Smart logic.

These settings control how rating values are defined, how they are displayed, and when the field becomes visible in the form.

How do general settings work for the Rating field?

The General tab contains all core options for configuring how the Rating field behaves. This is where you see the field type, it’s ID, and where you define the rating scale, labels, and submission requirements.

  • Label – defines the visible title of the field.
  • Hide label – hides the label on the front end.
  • Description – adds a short note below the field.
  • Show values – displays numeric values for each rating option, useful for scoring and analysis.
  • Show text – displays the label of the selected rating next to the icons on the front end.
  • Required – requires users to select a rating before submitting the form.

You can also manage the rating options:

  • Add or remove rating levels using the plus (+) and minus (−) buttons.
  • Modify labels such as Good, Nice, or Amazing.
  • Create larger scales (for example, 10-point ratings) by adding more options.
  • Use Bulk Edit to update multiple labels at once.

How does bulk editing work for the Rating field?

The Rating field includes a Bulk Edit option that allows you to update all rating labels at once.

When you click Bulk Edit, a panel opens where you can quickly modify the entire list of rating values instead of editing each option individually.

After saving, the updated values are applied directly to the field and can still be adjusted manually if needed.

How do advanced settings work for the Rating field?

The Advanced tab contains display-related settings that affect how the rating appears in your form.

  • Icon type – defines the visual style of the rating:
    • Stars
    • Hearts
    • Likes
  • Label position – controls where the label appears relative to the rating field:
    • Default
    • Top
    • Left
    • Right

These options allow you to adjust the look and feel of the Rating field to better match your form design.

Advanced tab showing icon type dropdown with stars, hearts, and likes

How can I use smart logic with the Rating field?

Smart Logic is available only in the Pro version of IvyForms.

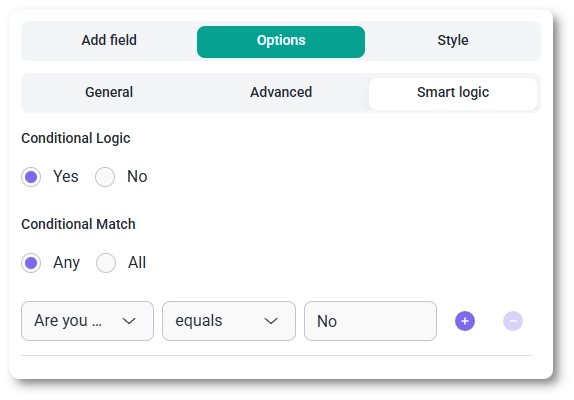
The Smart logic tab allows you to show or hide the Rating field based on conditions from other inputs. Once enabled, you can define rules that determine when the field should be displayed.

When smart logic is active, the Conditional match setting lets you choose how rules are evaluated:

  • Any – the field appears when at least one condition is met.
  • All – the field appears only when all conditions are satisfied.

For example, you can display the Rating field only after a user selects a service, completes a section, or submits specific answers earlier in the form.