Limited time discount
Spring Deals Are in Full Bloom
Up to 70%Off
Up to 70%Off
Grab Now
documentation-logo
Menu
  • Guides
  • Getting Started

How do I configure IvyForms after installation

ON THIS PAGE

Once IvyForms is installed and activated, you can configure its main options directly from your WordPress dashboard.

At this stage, IvyForms includes three configuration areas: General settingssecurity settings, and License settings. General and security settings control accessibility and spam protection. The License tab is used to activate the Pro version of IvyForms. Learn more about activating your IvyForms license.

Pro features remain unavailable until the license is activated.

Where can I find the settings in IvyForms?

You can open all IvyForms configuration options by navigating to WordPress Dashboard → IvyForms → Settings.

Inside this page, you’ll see the following tabs:

  • General – accessibility and backend layout controls.
  • Security – reCAPTCHA, hCaptcha, and Turnstile settings.
  • License — activate your IvyForms license key to unlock all Pro features. Full instructions are on the license activation page.

What can be configured through general settings?

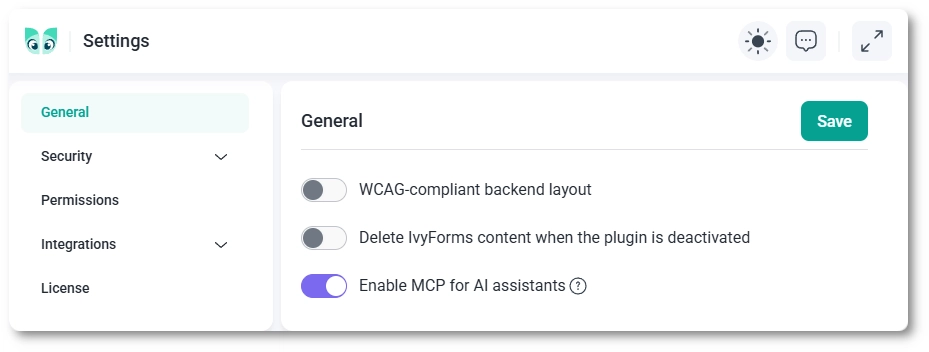
The General tab lets you enable WCAG accessibility and control what happens to your data when IvyForms is deactivated.

The WCAG-compliant backend layout toggle updates the interface to follow WCAG (Web Content Accessibility Guidelines), improving keyboard navigation and screen reader support. This is recommended if you want a more accessible experience in the WordPress admin area.

The Delete IvyForms content when the plugin is deactivated option removes all forms, entries, settings, and database tables when the plugin is deactivated from the WordPress Plugins page.

IvyForms General settings showing WCAG-compliant layout and the content deletion sliders enabled

Enabling the Delete IvyForms content when the plugin is deactivated option will permanently delete all IvyForms data when the plugin is deactivated. This action cannot be undone. You will see a warning before deactivation, but if you proceed, all forms, entries, settings, and related data will be removed. Please use this option with caution.

How do I enable Google reCAPTCHA in IvyForms?

You can enable Google reCAPTCHA under the Security tab. This feature helps protect your forms from spam and automated submissions. Follow these steps:

  1. Select your preferred reCAPTCHA version:
    • reCAPTCHA v2 – displays the “I’m not a robot” checkbox.
    • reCAPTCHA v2 Invisible – verifies legitimate users in the background.
    • reCAPTCHA v3 – score-based spam detection with minimal user interaction.
  2. Enter your Site Key and Secret Key in the corresponding fields.
  3. Select your preferred reCAPTCHA language.
  4. Click Save Changes to apply the settings.

Some languages in the dropdown are marked with an asterisk (*). The asterisk indicates that the audio challenge is only available for the Checkbox widget.

You can check the complete list of supported languages in the Google reCAPTCHA language documentation.


You can generate your keys from the Google reCAPTCHA Admin Console.

reCAPTCHA settings tab in IvyForms showing keys and version tabs

How do I enable hCaptcha in IvyForms?

hCaptcha helps protect your forms from spam and automated submissions while respecting user privacy. You can enable it directly from the hCaptcha tab in the form settings.

  • Generate a free Site Key and Secret Key in your hCaptcha account.
  • Enter the generated keys into the corresponding fields.
  • Click Save Changes to apply the settings.
hCaptcha site key and secret key fields in IvyForms settings

How do I enable Cloudflare Turnstile in IvyForms?

Cloudflare Turnstile provides spam protection without interactive challenges for most users. You can enable it from the Turnstile tab in the form settings.

  • Create a free Turnstile widget in your Cloudflare dashboard to obtain a Site Key and Secret Key.
  • Enter the keys into the appropriate fields in IvyForms.
  • Select the preferred Theme (Auto, Light, or Dark).
  • Click Save Changes to activate Turnstile protection.
Cloudflare Turnstile site key, secret key, and theme options in IvyForms settings

What happens after I configure these options?

All settings you save will be applied globally across IvyForms. Any new form you build will automatically inherit your accessibility and spam-protection preferences.

When your license is activated, all Pro templates, fields, and advanced features become available throughout the plugin.

You can read the full activation guide on the license activation page.