


Most WordPress sites reach for a plugin the moment they need a contact form. It works, but it is not the only way. You can create forms in WordPress without…
Table of contents
You don’t need a full online store to collect money on your website. A WordPress payment form lets you accept credit card payments, process donations, or charge for services with a single embedded form. No shopping cart, no product catalog, no WooCommerce overhead.
With plugins like WPForms, WP Simple Pay, and Gravity Forms, you can connect a payment gateway like Stripe or PayPal and start collecting payments in under 15 minutes.
This guide covers how payment forms process transactions, which plugins work best, how to set one up step by step, and how to handle recurring billing, security, fees, and common troubleshooting issues.
What Is a WordPress Payment Form
A WordPress payment form is a form embedded on a WordPress site that collects payment details and processes transactions without requiring a full ecommerce store. It connects to a payment gateway like Stripe or PayPal, handles the money transfer, and confirms the order. That’s it.
It’s not the same thing as WooCommerce. A WooCommerce setup gives you product pages, a shopping cart, inventory tracking, shipping calculations. A payment form skips all of that. You place a single form on a page, the customer fills it out, pays, and you’re done.
WordPress powers over 43% of all websites globally (W3Techs, 2025). A big chunk of those sites aren’t stores. They’re service businesses, freelancers, nonprofits, coaches, and consultants who just need to collect a payment for something specific.
Common use cases:
- Service deposits and consultation fees
- Donations and fundraising campaigns
- Event registration with a fee attached
- One-time product purchases without a cart
- Recurring subscription billing
The form itself handles the front end (what the customer sees and fills out). The payment gateway handles the back end (moving money from the customer’s card to your account). Your WordPress database never touches the actual card numbers when you’re using a modern plugin with tokenization.
If you’ve built WordPress forms before, you already know the basics. Payment forms just add a transaction layer on top of that same foundation.
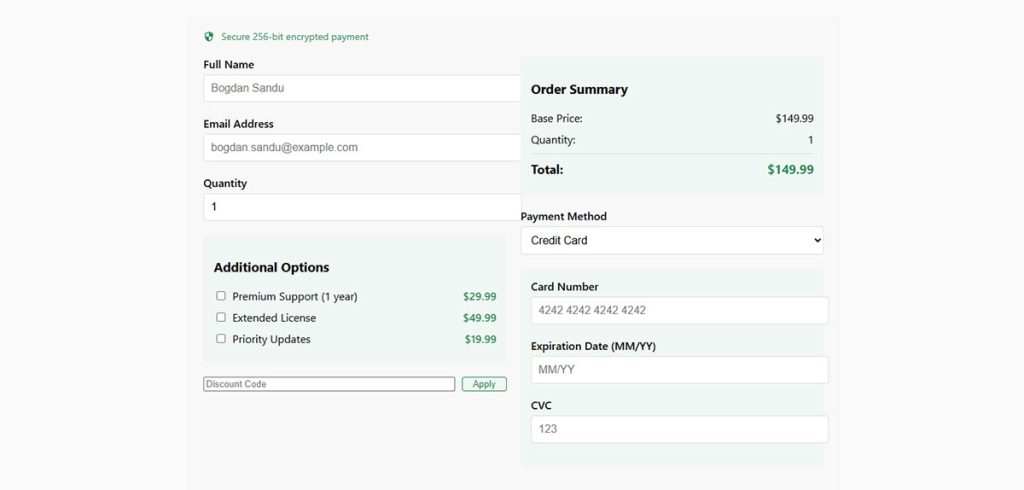
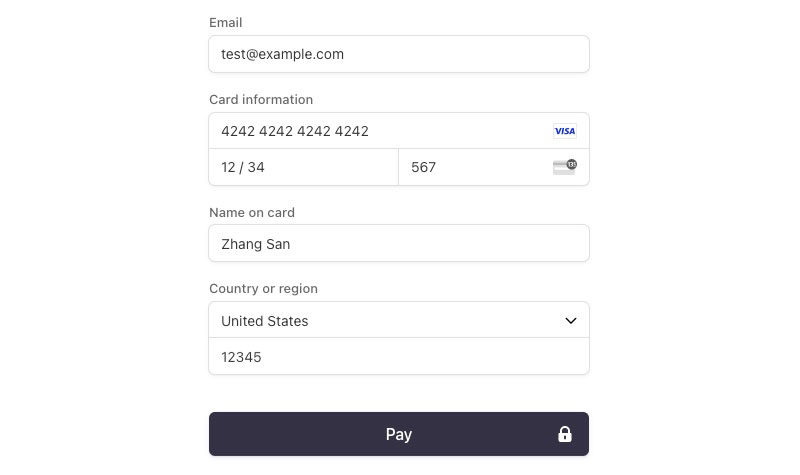
How WordPress Payment Forms Process Transactions
![]()
![]()
The flow is simpler than most people think. A customer lands on your page, fills in their name and email, enters card details into a secure field, and clicks submit. From there, the form plugin sends the card data to the payment gateway (Stripe, PayPal, Square) using tokenization. The gateway charges the card and sends back a confirmation. Your site stores the order record but never the actual card number.
Baymard Institute research shows that 18% of US online shoppers have abandoned a purchase because the checkout process was too complicated. Payment forms solve this by cutting the process down to a single page with a few fields.
On-Site vs. Off-Site Payment Processing
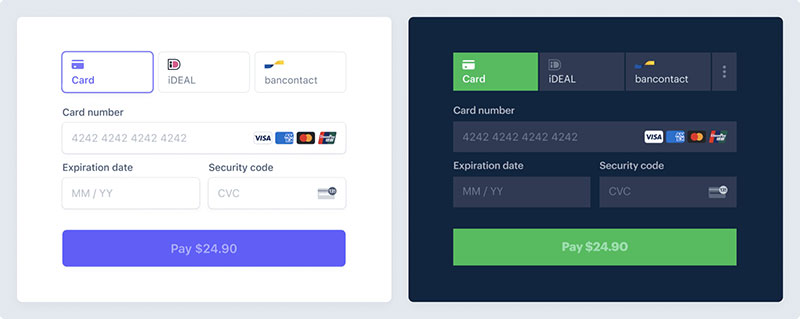
On-site processing keeps the customer on your WordPress page the entire time. Stripe Elements is the most common example. The card field loads inside your form through an iframe, so the card data goes straight to Stripe’s servers without passing through yours.
Off-site processing redirects the customer to the gateway’s own checkout page. PayPal Standard works this way. The customer leaves your site, completes the payment on PayPal, and gets sent back to a confirmation page.
| Method | Example | Best For |
|---|---|---|
| On-site | Stripe Elements | Seamless experience, branded checkout |
| Off-site | PayPal Standard | Buyer trust, no SSL setup needed |
| Hybrid | PayPal Checkout | Customers choose card or PayPal account |
On-site keeps the experience cleaner. Off-site leans on the gateway’s brand trust. Most form plugins now support both.
PCI Compliance and What Plugin Users Actually Need to Know
PCI DSS (Payment Card Industry Data Security Standard) is the set of rules that governs how businesses handle credit card data. If you accept cards, it applies to you. No exceptions, regardless of size.
But here’s the thing most WordPress site owners miss: when you use a plugin like WPForms or WP Simple Pay with Stripe Elements, the card data never touches your server. Stripe handles it through tokenization. Your site gets a token (a random string), not the actual card number.
That puts most WordPress sites at PCI SAQ A or SAQ A-EP, the lowest compliance levels. You still need an SSL certificate, and you still need to keep WordPress and your plugins updated. But you don’t need quarterly vulnerability scans or a third-party audit.
PCI DSS v4.0 took full effect in March 2025, requiring stronger passwords (minimum 12 characters) and additional security controls. For plugin-based payment forms, the practical impact is small because the gateway absorbs most of the compliance burden.
Setting Up Your Payment Gateway Account
Before diving into code, you need to establish your payment processing infrastructure. This foundation determines how your custom payment solution will handle transactions.
Choosing the Right Payment Gateway
Your gateway choice impacts fees, user experience, and implementation complexity. PayPal offers the simplest direct integration for beginners. Their HTML button code implementation requires minimal coding knowledge while providing reliable payment processing.
Stripe delivers a more seamless checkout experience but demands stronger JavaScript knowledge. Their API enables fully customized payment forms with sophisticated validation.
Square works well for businesses already using their point-of-sale systems, creating unified reporting across online and offline sales.
Consider these factors when choosing:
- Transaction fees: Compare percentage rates and fixed fees per transaction
- Monthly costs: Some gateways charge subscription fees beyond processing
- Regional availability: Verify support for your customers’ countries
- Currency conversion: Check if you need multi-currency support
Setting Up API Credentials
Once you’ve selected a gateway, create developer credentials:
- Register for a developer account on your chosen payment processor’s site
- Generate API keys (typically a public/private key pair)
- Enable sandbox/test mode for development
Keep private keys secure! Never expose them in client-side code. Store them in your wp-config.php file or use WordPress’s built-in options API for safe storage.
Understanding Payment Security Standards
Payment forms demand serious security measures. Your manual gateway integration must adhere to PCI compliance guidelines when handling credit card data.
The simplest approach? Use tokenization. Let the payment gateway handle sensitive information while your code manages just the tokens representing payment methods.
Always serve your payment pages via HTTPS. A proper SSL certificate isn’t optional—it’s essential for encryption and customer trust. Most payment gateways won’t even function without it.
Creating the Basic Form Structure
With gateway credentials ready, it’s time to build your WordPress payment form without plugins.
Adding a New Page in WordPress
Start with a dedicated payment page:
- Create a new WordPress page (Pages → Add New)
- Choose a clean template with minimal distractions
- Consider removing sidebars for better focus
- Set the page to require login if handling sensitive information
Building the HTML Form
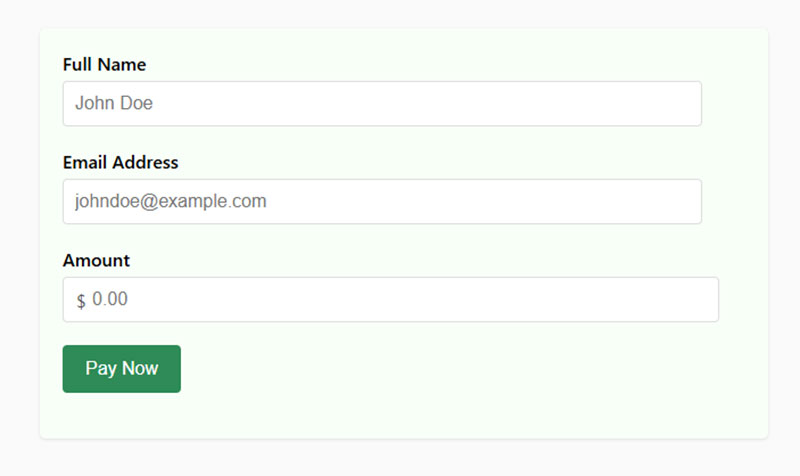
Your form’s structure determines both functionality and user experience. Start with this basic HTML template that you’ll enhance with payment processing code:
<form id="custom-payment-form" method="POST" action="<?php echo esc_url( admin_url('admin-post.php') ); ?>">
    <input type="hidden" name="action" value="process_payment">
    <?php wp_nonce_field( 'payment_nonce' ); ?>

    <div class="form-row">
        <label for="customer_name">Full Name</label>
        <input type="text" id="customer_name" name="customer_name" required>
    </div>

    <div class="form-row">
        <label for="customer_email">Email Address</label>
        <input type="email" id="customer_email" name="customer_email" required>
    </div>

    <div class="form-row">
        <label for="payment_amount">Amount</label>
        <input type="number" id="payment_amount" name="payment_amount" min="1" step="0.01" required>
    </div>

    <!-- Payment gateway specific fields will go here -->

    <div class="form-row">
        <button type="submit" id="submit-payment">Pay Now</button>
    </div>
</form>
This bare-bones structure includes:
- Form submission handling through WordPress admin-post.php
- WordPress nonce field for basic security
- Essential customer information fields
- Placeholder for payment-specific elements
Enhance form security with proper input validation attributes. The required attribute prevents empty submissions while type="email" enforces proper email format.
Styling Your Form with CSS
Clean, professional styling builds trust in your payment process. Add this CSS to your theme’s stylesheet or a custom CSS section:
#custom-payment-form {
    max-width: 600px;
    margin: 0 auto;
    padding: 20px;
    background: #f8f8f8;
    border-radius: 5px;
    box-shadow: 0 1px 3px rgba(0,0,0,0.1);
}

.form-row {
    margin-bottom: 20px;
}

.form-row label {
    display: block;
    margin-bottom: 5px;
    font-weight: 500;
}

.form-row input {
    width: 100%;
    padding: 10px;
    border: 1px solid #ddd;
    border-radius: 4px;
    font-size: 16px;
}

button#submit-payment {
    background: #0073aa;
    color: white;
    border: none;
    padding: 12px 20px;
    border-radius: 4px;
    cursor: pointer;
    font-size: 16px;
    font-weight: 500;
}

button#submit-payment:hover {
    background: #005177;
}

/* Add visual feedback */
.form-row input:focus {
    border-color: #0073aa;
    outline: none;
    box-shadow: 0 0 0 2px rgba(0,115,170,0.2);
}

/* Error state */
.form-row input.error {
    border-color: #d63638;
}
This CSS provides:
- Form element styling with appropriate spacing
- Responsive design that works on mobile devices
- Visual feedback for interactions and errors
- Color scheme compatible with WordPress defaults
For mobile compatibility, test your form on multiple devices. A responsive payment form adjusts gracefully to different screen sizes without horizontal scrolling or tiny tap targets.
Add this media query for better mobile experience:
@media (max-width: 600px) {
    #custom-payment-form {
        padding: 15px;
    }

    .form-row input {
        font-size: 16px; /* Prevents iOS zoom on focus */
    }

    button#submit-payment {
        width: 100%;
    }
}
In the next sections, we’ll connect this foundation to actual payment processing code, implementing server-side validation and direct payment API integration.
Connecting to Payment Gateways
Now that your form structure exists, you need to connect it to actual payment processing. This requires direct payment API implementation without relying on plugins.
Setting Up PayPal Integration
PayPal offers the simplest code-based checkout integration for WordPress beginners. Their system handles most of the payment security concerns while requiring minimal custom code.
Basic PayPal Form Implementation:
<form id="paypal-payment-form" method="POST" action="https://www.paypal.com/cgi-bin/webscr">
    <input type="hidden" name="cmd" value="_xclick">
    <input type="hidden" name="business" value="[email protected]">
    <input type="hidden" name="item_name" value="Your Product">
    <input type="hidden" name="item_number" value="12345">
    <input type="hidden" name="currency_code" value="USD">

    <div class="form-row">
        <label for="amount">Amount</label>
        <input type="number" name="amount" id="amount" min="1" step="0.01" required>
    </div>

    <div class="form-row">
        <label for="custom">Your Email</label>
        <input type="email" name="custom" id="custom" required>
    </div>

    <input type="hidden" name="return" value="<?php echo esc_url(home_url('/thank-you/')); ?>">
    <input type="hidden" name="cancel_return" value="<?php echo esc_url(home_url('/payment-cancelled/')); ?>">
    <input type="hidden" name="notify_url" value="<?php echo esc_url(home_url('/ipn-handler/')); ?>">

    <div class="form-row">
        <button type="submit">Pay with PayPal</button>
    </div>
</form>
This form redirects users to PayPal for payment. The critical fields include:
business: Your PayPal email addressreturn: Success page URLcancel_return: Page shown if user cancelsnotify_url: Your IPN handler endpoint
For more control, implement PayPal’s IPN (Instant Payment Notification) system. Create a dedicated endpoint in WordPress to process these notifications:
// In functions.php or a custom include file
function my_handle_paypal_ipn() {
    // Only process POST requests
    if ($_SERVER['REQUEST_METHOD'] !== 'POST') {
        return;
    }

    // Send back data to PayPal for verification
    $payload = 'cmd=_notify-validate';
    foreach ($_POST as $key => $value) {
        $payload .= '&' . $key . '=' . urlencode(stripslashes($value));
    }

    // Set up request to PayPal
    $args = array(
        'body'        => $payload,
        'timeout'     => 30,
        'httpversion' => '1.1',
        'headers'     => array(
            'Content-Type' => 'application/x-www-form-urlencoded',
        )
    );

    // Send validation request to PayPal
    $response = wp_remote_post('https://ipnpb.paypal.com/cgi-bin/webscr', $args);

    // Process verification response
    if (!is_wp_error($response) && wp_remote_retrieve_body($response) === 'VERIFIED') {
        // Payment verified, process order
        $payment_status = isset($_POST['payment_status']) ? sanitize_text_field($_POST['payment_status']) : '';
        $txn_id = isset($_POST['txn_id']) ? sanitize_text_field($_POST['txn_id']) : '';
        $amount = isset($_POST['mc_gross']) ? sanitize_text_field($_POST['mc_gross']) : '';
        $custom = isset($_POST['custom']) ? sanitize_text_field($_POST['custom']) : '';

        if ($payment_status === 'Completed') {
            // Store payment in database
            // Send confirmation email
            // Update user access/permissions
        }
    }

    exit;
}

// Register the IPN endpoint
add_action('init', function() {
    add_rewrite_rule('^ipn-handler/?$', 'index.php?ipn_handler=1', 'top');
});

add_filter('query_vars', function($vars) {
    $vars[] = 'ipn_handler';
    return $vars;
});

add_action('template_redirect', function() {
    if (get_query_var('ipn_handler')) {
        my_handle_paypal_ipn();
        exit;
    }
});
This code creates a custom endpoint that receives and verifies PayPal notifications, ensuring payments are legitimate before granting access or delivering digital goods.
Implementing Stripe Integration
Stripe offers a more modern direct payment API with better user experience but requires more JavaScript knowledge. Instead of redirecting users, Stripe processes payments on your site via their JavaScript library.
First, add Stripe.js to your WordPress header:
function add_stripe_js() {
    if (is_page('payment-page')) { // Only load on payment page
        wp_enqueue_script('stripe-js', 'https://js.stripe.com/v3/', array(), null, false);
        wp_enqueue_script('my-stripe-integration', get_template_directory_uri() . '/js/stripe-integration.js', array('jquery', 'stripe-js'), '1.0', true);

        // Pass variables to JavaScript
        wp_localize_script('my-stripe-integration', 'my_stripe_vars', array(
            'publishable_key' => 'pk_test_your_publishable_key',
            'ajax_url' => admin_url('admin-ajax.php'),
            'nonce' => wp_create_nonce('stripe-nonce')
        ));
    }
}
add_action('wp_enqueue_scripts', 'add_stripe_js');
Then create the form for Stripe:
<form id="stripe-payment-form">
    <div class="form-row">
        <label for="name">Name</label>
        <input type="text" id="name" name="name" required>
    </div>

    <div class="form-row">
        <label for="email">Email</label>
        <input type="email" id="email" name="email" required>
    </div>

    <div class="form-row">
        <label for="amount">Amount</label>
        <input type="number" id="amount" name="amount" min="1" step="0.01" required>
    </div>

    <div class="form-row">
        <label for="card-element">Credit or Debit Card</label>
        <div id="card-element"></div>
        <div id="card-errors" role="alert"></div>
    </div>

    <button type="submit" id="submit-payment">Pay Now</button>
</form>
Create the stripe-integration.js file:
document.addEventListener('DOMContentLoaded', function() {
    // Initialize Stripe
    const stripe = Stripe(my_stripe_vars.publishable_key);
    const elements = stripe.elements();

    // Create card element
    const cardElement = elements.create('card');
    cardElement.mount('#card-element');

    // Handle validation errors
    cardElement.addEventListener('change', function(event) {
        const displayError = document.getElementById('card-errors');
        if (event.error) {
            displayError.textContent = event.error.message;
        } else {
            displayError.textContent = '';
        }
    });

    // Handle form submission
    const form = document.getElementById('stripe-payment-form');
    form.addEventListener('submit', function(event) {
        event.preventDefault();

        const name = document.getElementById('name').value;
        const email = document.getElementById('email').value;
        const amount = document.getElementById('amount').value;

        // Create payment method and handle next steps
        stripe.createPaymentMethod({
            type: 'card',
            card: cardElement,
            billing_details: {
                name: name,
                email: email
            }
        }).then(function(result) {
            if (result.error) {
                const errorElement = document.getElementById('card-errors');
                errorElement.textContent = result.error.message;
            } else {
                // Send payment method ID to server
                fetch(my_stripe_vars.ajax_url, {
                    method: 'POST',
                    headers: {
                        'Content-Type': 'application/x-www-form-urlencoded',
                    },
                    body: new URLSearchParams({
                        action: 'process_stripe_payment',
                        payment_method_id: result.paymentMethod.id,
                        name: name,
                        email: email,
                        amount: amount,
                        nonce: my_stripe_vars.nonce
                    })
                })
                .then(response => response.json())
                .then(data => {
                    if (data.requires_action) {
                        // Use the payment intent for 3D Secure if needed
                        stripe.confirmCardPayment(data.payment_intent_client_secret).then(function(result) {
                            if (result.error) {
                                // Show error message
                                document.getElementById('card-errors').textContent = result.error.message;
                            } else {
                                // Payment successful - redirect to success page
                                window.location.href = data.success_url;
                            }
                        });
                    } else if (data.success) {
                        // Payment successful - redirect to success page
                        window.location.href = data.success_url;
                    } else {
                        // Show error
                        document.getElementById('card-errors').textContent = data.error_message;
                    }
                });
            }
        });
    });
});
Adding Custom Functions to WordPress
Now that your payment form connects to a gateway, you need backend functionality to process submissions and handle transactions.
Creating a Custom functions.php Snippet
Never edit your theme’s functions.php directly! Instead, create a site-specific plugin or use a code snippets plugin. Here’s a safe approach:
- Create a folder called
my-payment-functionsin your/wp-content/plugins/directory - Inside that folder, create a file called
my-payment-functions.php - Add this header:
<?php
/**
 * Plugin Name: My Custom Payment Functions
 * Description: Custom code for payment processing without plugins
 * Version: 1.0
 * Author: Your Name
 */

// If this file is called directly, abort.
if (!defined('WPINC')) {
    die;
}
This creates a proper WordPress plugin that can be activated/deactivated without editing theme files.
Processing Form Submissions
For Stripe payments, create an AJAX handler to process the payment server-side:
// Process Stripe payments
function process_stripe_payment() {
    // Verify nonce
    if (!isset($_POST['nonce']) || !wp_verify_nonce($_POST['nonce'], 'stripe-nonce')) {
        wp_send_json_error(array('error_message' => 'Security check failed'));
    }

    // Sanitize inputs
    $payment_method_id = sanitize_text_field($_POST['payment_method_id']);
    $name = sanitize_text_field($_POST['name']);
    $email = sanitize_email($_POST['email']);
    $amount = floatval($_POST['amount']) * 100; // Convert to cents for Stripe

    // Include Stripe PHP library (either via Composer or manual include)
    require_once plugin_dir_path(__FILE__) . 'vendor/autoload.php';

    // Set API key
    \Stripe\Stripe::setApiKey('sk_test_your_secret_key');

    try {
        // Create payment intent
        $intent = \Stripe\PaymentIntent::create([
            'amount' => $amount,
            'currency' => 'usd',
            'payment_method' => $payment_method_id,
            'confirmation_method' => 'manual',
            'confirm' => true,
            'metadata' => [
                'customer_name' => $name,
                'customer_email' => $email
            ]
        ]);

        if ($intent->status === 'requires_action' && $intent->next_action->type === 'use_stripe_sdk') {
            // 3D Secure authentication needed
            wp_send_json([
                'requires_action' => true,
                'payment_intent_client_secret' => $intent->client_secret,
            ]);
        } else if ($intent->status === 'succeeded') {
            // Payment successful

            // Save transaction in WordPress database
            $transaction_id = wp_insert_post([
                'post_title' => 'Payment from ' . $name,
                'post_type' => 'payment_record', // Custom post type (you'd need to register this)
                'post_status' => 'publish',
                'meta_input' => [
                    'payment_email' => $email,
                    'payment_amount' => $amount / 100, // Convert back to dollars
                    'payment_id' => $intent->id,
                    'payment_date' => current_time('mysql')
                ]
            ]);

            // Send confirmation email
            $to = $email;
            $subject = 'Payment Confirmation';
            $message = "Dear $name,\n\nThank you for your payment of $" . ($amount / 100) . ".\n\nTransaction ID: " . $intent->id;
            $headers = 'From: ' . get_bloginfo('name') . ' <' . get_bloginfo('admin_email') . '>';

            wp_mail($to, $subject, $message, $headers);

            // Return success response
            wp_send_json([
                'success' => true,
                'success_url' => home_url('/thank-you/'),
                'transaction_id' => $intent->id
            ]);
        } else {
            // Payment failed
            wp_send_json_error(['error_message' => 'Payment failed: ' . $intent->status]);
        }
    } catch (\Stripe\Exception\ApiErrorException $e) {
        // Catch Stripe API errors
        wp_send_json_error(['error_message' => $e->getMessage()]);
    } catch (Exception $e) {
        // Catch any other errors
        wp_send_json_error(['error_message' => 'Server error: ' . $e->getMessage()]);
    }

    exit;
}
add_action('wp_ajax_process_stripe_payment', 'process_stripe_payment');
add_action('wp_ajax_nopriv_process_stripe_payment', 'process_stripe_payment');
Handling Payment Confirmations
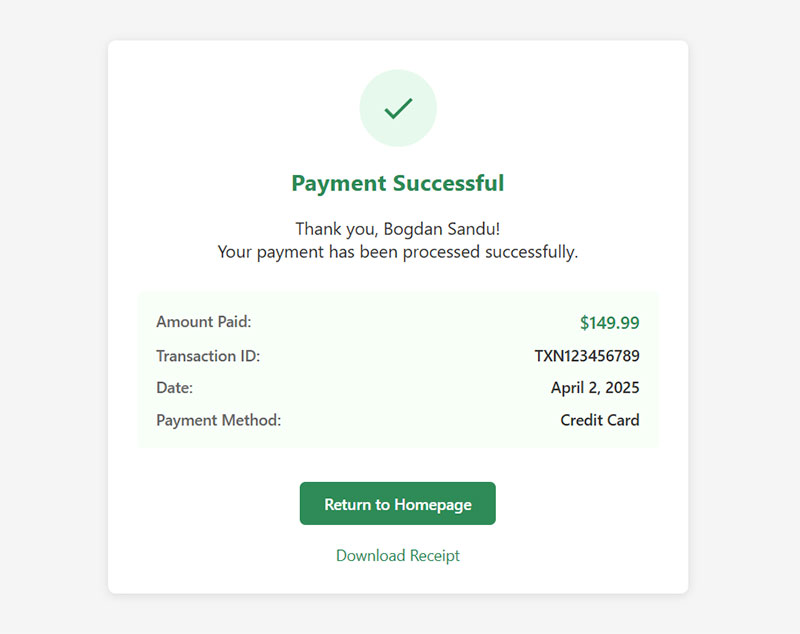
Create a custom thank-you page that verifies the transaction:
function payment_confirmation_shortcode($atts) {
    // Check if we have a transaction ID
    $transaction_id = isset($_GET['tx']) ? sanitize_text_field($_GET['tx']) : '';

    if (empty($transaction_id)) {
        return '<p>No transaction information available.</p>';
    }

    // For PayPal, verify with PayPal's API
    // For Stripe, check your database records

    // Example verification using custom post type
    $args = [
        'post_type' => 'payment_record',
        'meta_query' => [
            [
                'key' => 'payment_id',
                'value' => $transaction_id,
                'compare' => '='
            ]
        ]
    ];

    $query = new WP_Query($args);

    if ($query->have_posts()) {
        $query->the_post();
        $name = get_the_title();
        $amount = get_post_meta(get_the_ID(), 'payment_amount', true);
        $date = get_post_meta(get_the_ID(), 'payment_date', true);

        $output = '<div class="payment-confirmation">';
        $output .= '<h3>Payment Confirmation</h3>';
        $output .= '<p>Thank you, ' . esc_html(str_replace('Payment from ', '', $name)) . '!</p>';
        $output .= '<p>Your payment of <strong>$' . esc_html($amount) . '</strong> has been received.</p>';
        $output .= '<p>Transaction ID: ' . esc_html($transaction_id) . '</p>';
        $output .= '<p>Date: ' . esc_html(date('F j, Y', strtotime($date))) . '</p>';
        $output .= '</div>';

        wp_reset_postdata();
        return $output;
    } else {
        return '<p>Unable to verify this transaction. Please contact support.</p>';
    }
}
add_shortcode('payment_confirmation', 'payment_confirmation_shortcode');
Use this shortcode on your thank-you page:
[payment_confirmation]
Creating a Custom Post Type for Transactions
![]()
![]()
For better organization, create a dedicated custom post type to store payment records:
function register_payment_record_post_type() {
    $args = [
        'public' => false,
        'show_ui' => true,
        'show_in_menu' => true,
        'menu_icon' => 'dashicons-money-alt',
        'labels' => [
            'name' => 'Payment Records',
            'singular_name' => 'Payment Record',
            'menu_name' => 'Payments'
        ],
        'supports' => ['title'],
        'capability_type' => 'post',
        'capabilities' => [
            'create_posts' => 'do_not_allow' // Only system-generated
        ],
        'map_meta_cap' => true
    ];

    register_post_type('payment_record', $args);
}
add_action('init', 'register_payment_record_post_type');

// Add custom columns to admin
function payment_record_columns($columns) {
    $new_columns = [
        'cb' => $columns['cb'],
        'title' => __('Customer', 'textdomain'),
        'email' => __('Email', 'textdomain'),
        'amount' => __('Amount', 'textdomain'),
        'transaction_id' => __('Transaction ID', 'textdomain'),
        'date' => __('Date', 'textdomain')
    ];
    return $new_columns;
}
add_filter('manage_payment_record_posts_columns', 'payment_record_columns');

// Fill custom columns
function payment_record_column_content($column, $post_id) {
    switch ($column) {
        case 'email':
            echo esc_html(get_post_meta($post_id, 'payment_email', true));
            break;
        case 'amount':
            echo '$' . esc_html(get_post_meta($post_id, 'payment_amount', true));
            break;
        case 'transaction_id':
            echo esc_html(get_post_meta($post_id, 'payment_id', true));
            break;
        case 'date':
            echo esc_html(get_post_meta($post_id, 'payment_date', true));
            break;
    }
}
add_action('manage_payment_record_posts_custom_column', 'payment_record_column_content', 10, 2);
This lightweight payment solution provides complete control over your WordPress payment form without plugins. By using direct payment API integration with either PayPal or Stripe, you manage the entire payment process while maintaining code efficiency.
Implementing Security Measures
Security isn’t optional when processing payments. Your DIY payment form needs robust protection against common threats.
Form Protection Techniques
Start with WordPress nonces to prevent CSRF attacks:
// Add this to your form
wp_nonce_field('payment_form_nonce', 'payment_nonce');

// Verify in your processing function
if (!isset($_POST['payment_nonce']) || !wp_verify_nonce($_POST['payment_nonce'], 'payment_form_nonce')) {
    wp_die('Security check failed');
}
Implement rate limiting to prevent brute force attacks. This simple implementation blocks excessive submissions:
function check_submission_rate() {
    $ip_address = $_SERVER['REMOTE_ADDR'];
    $transient_name = 'payment_attempts_' . md5($ip_address);
    $attempts = get_transient($transient_name);

    if (false === $attempts) {
        // First attempt, set to 1
        set_transient($transient_name, 1, 3600); // Expires in 1 hour
    } else if ($attempts > 5) {
        // Too many attempts
        wp_die('Too many payment attempts. Please try again later.');
    } else {
        // Increment attempts
        set_transient($transient_name, $attempts + 1, 3600);
    }
}
Add CAPTCHA protection to prevent bots from submitting your form. Google’s reCAPTCHA provides a simple implementation:
// Add to your form
function add_recaptcha_to_form() {
    echo '<div class="g-recaptcha" data-sitekey="your-site-key"></div>';
    echo '<script src="https://www.google.com/recaptcha/api.js" async defer></script>';
}

// Verify in your processing function
function verify_recaptcha() {
    if (!isset($_POST['g-recaptcha-response'])) {
        return false;
    }

    $recaptcha_response = sanitize_text_field($_POST['g-recaptcha-response']);
    $request = wp_remote_post('https://www.google.com/recaptcha/api/siteverify', [
        'body' => [
            'secret' => 'your-secret-key',
            'response' => $recaptcha_response,
            'remoteip' => $_SERVER['REMOTE_ADDR']
        ]
    ]);

    if (is_wp_error($request)) {
        return false;
    }

    $result = json_decode(wp_remote_retrieve_body($request));
    return $result->success;
}
Secure Data Handling
Never store credit card details on your server. Use tokenization from your payment gateway. For data you must store, implement proper encryption:
// Encrypt sensitive data
function encrypt_sensitive_data($data, $key) {
    $iv = openssl_random_pseudo_bytes(openssl_cipher_iv_length('aes-256-cbc'));
    $encrypted = openssl_encrypt($data, 'aes-256-cbc', $key, 0, $iv);
    return base64_encode($encrypted . '::' . $iv);
}

// Decrypt when needed
function decrypt_sensitive_data($data, $key) {
    list($encrypted_data, $iv) = explode('::', base64_decode($data), 2);
    return openssl_decrypt($encrypted_data, 'aes-256-cbc', $key, 0, $iv);
}

// Store encryption key securely in wp-config.php
// define('PAYMENT_ENCRYPTION_KEY', 'your-long-random-string');
Limit database access by creating custom user roles with restricted permissions:
function create_payment_admin_role() {
    add_role('payment_admin', 'Payment Administrator', [
        'read' => true,
        'edit_payment_records' => true,
        'read_payment_records' => true,
        'delete_payment_records' => false,
    ]);
}
register_activation_hook(__FILE__, 'create_payment_admin_role');

// Add capabilities to existing admin role
function add_payment_caps() {
    $admin = get_role('administrator');
    $admin->add_cap('edit_payment_records');
    $admin->add_cap('read_payment_records');
    $admin->add_cap('delete_payment_records');
}
register_activation_hook(__FILE__, 'add_payment_caps');
Error Handling and Logging
Implement user-friendly error messages that don’t reveal sensitive information:
function handle_payment_error($error_code, $technical_message) {
    // Log the technical error
    error_log('Payment error: ' . $technical_message);

    // User-friendly messages
    $user_messages = [
        'invalid_card' => 'The card information appears to be invalid. Please check and try again.',
        'insufficient_funds' => 'The payment could not be processed. Please try another payment method.',
        'gateway_error' => 'We\'re experiencing issues with our payment processor. Please try again shortly.',
        'security_error' => 'Your session has expired. Please refresh the page and try again.'
    ];

    // Return user-friendly message
    if (isset($user_messages[$error_code])) {
        return $user_messages[$error_code];
    } else {
        return 'An error occurred during payment processing. Please try again or contact support.';
    }
}
Set up comprehensive error logging for payment-related events:
function log_payment_event($event_type, $data = []) {
    if (!file_exists(WP_CONTENT_DIR . '/payment-logs')) {
        mkdir(WP_CONTENT_DIR . '/payment-logs', 0755, true);
    }

    $log_file = WP_CONTENT_DIR . '/payment-logs/payment-' . date('Y-m-d') . '.log';
    $timestamp = date('Y-m-d H:i:s');

    // Sanitize data for logging (remove sensitive info)
    if (isset($data['card_number'])) {
        $data['card_number'] = 'XXXX-XXXX-XXXX-' . substr($data['card_number'], -4);
    }

    if (isset($data['cvv'])) {
        $data['cvv'] = 'XXX';
    }

    $log_entry = $timestamp . ' | ' . $event_type . ' | ' . json_encode($data) . PHP_EOL;

    file_put_contents($log_file, $log_entry, FILE_APPEND);
}
Testing Your Payment Form
Thorough testing ensures your custom payment solution works flawlessly before going live.
Using Sandbox/Test Environments
Every major payment gateway provides test environments. Create dedicated sandbox credentials:
PayPal Sandbox:
- Sign up for a PayPal Developer account at developer.paypal.com
- Create both business (merchant) and personal (buyer) sandbox accounts
- Use sandbox emails/passwords for testing
- Set your form’s action URL to
https://www.sandbox.paypal.com/cgi-bin/webscr
Stripe Test Mode:
- Obtain test API keys from your Stripe dashboard
- Use Stripe’s test card numbers:
- 4242 4242 4242 4242 (Visa, success)
- 4000 0000 0000 0002 (Visa, declined)
- 4000 0000 0000 3220 (Visa, 3D Secure required)
Test various payment scenarios including:
- Successful payment: Standard transaction with approval
- Declined payment: Insufficient funds or invalid card
- 3D Secure authentication: Additional verification required
- Form validation errors: Missing fields or invalid data
Verify that webhooks and notifications work properly:
// Test webhook endpoint manually
function test_payment_webhook() {
    // Create mock webhook data
    $test_data = [
        'event_type' => 'payment_success',
        'transaction_id' => 'TEST_' . time(),
        'amount' => '50.00',
        'status' => 'completed'
    ];

    // Process webhook with test data
    $result = process_payment_webhook($test_data);

    // Output result
    return $result ? 'Webhook test successful' : 'Webhook test failed';
}

// Make this function accessible for testing
add_action('wp_ajax_test_payment_webhook', function() {
    echo test_payment_webhook();
    exit;
});
Cross-browser and Device Testing
Test your form on various browsers and devices. The custom checkout experience must work universally:
- Major browsers: Chrome, Firefox, Safari, Edge
- Mobile devices: iPhone, Android phones, tablets
- Different screen sizes: Desktop, laptop, tablet, phone
Use browser developer tools to simulate different devices and test responsive design. Verify that all form elements resize properly and remain functional.
Check loading times across devices and connections:
// Add timing data to your page
function add_performance_monitoring() {
    ?>
    <script>
        // Record form load time
        window.addEventListener('load', function() {
            const loadTime = performance.now();
            console.log('Form loaded in ' + loadTime + 'ms');

            // Send analytics if needed
            if (loadTime > 3000) {
                // Form is loading slowly, log this
                navigator.sendBeacon('<?php echo admin_url('admin-ajax.php'); ?>?action=log_slow_form_load&time=' + loadTime);
            }
        });

        // Record submission time
        document.querySelector('#payment-form').addEventListener('submit', function() {
            window.submissionStart = performance.now();
        });
    </script>
    <?php
}
add_action('wp_footer', 'add_performance_monitoring');
User Acceptance Testing
Recruit real users to test your payment flow. Their feedback reveals usability issues you might miss:
- Create test scenarios: “Buy Product X using a credit card” or “Make a donation”
- Observe user interactions: Where do they hesitate or get confused?
- Ask for feedback: What was clear? What was confusing?
- Measure completion rates: How many successfully complete the payment?
Track form abandonment to identify potential issues:
// Track form abandonment
function track_form_abandonment() {
    ?>
    <script>
        // Record when user starts filling the form
        const formInputs = document.querySelectorAll('#payment-form input, #payment-form select');
        let formStarted = false;

        formInputs.forEach(input => {
            input.addEventListener('focus', function() {
                if (!formStarted) {
                    formStarted = true;
                    // Record form start
                    navigator.sendBeacon('<?php echo admin_url('admin-ajax.php'); ?>?action=log_form_start');

                    // Set up abandonment tracking
                    window.addEventListener('beforeunload', function() {
                        if (formStarted && !formSubmitted) {
                            navigator.sendBeacon('<?php echo admin_url('admin-ajax.php'); ?>?action=log_form_abandonment');
                        }
                    });
                }
            });
        });

        // Flag for successful submission
        let formSubmitted = false;
        document.querySelector('#payment-form').addEventListener('submit', function() {
            formSubmitted = true;
        });
    </script>
    <?php
}
add_action('wp_footer', 'track_form_abandonment');
Create an admin dashboard for monitoring test results:
function payment_testing_dashboard() {
    // Create custom admin page
    add_menu_page(
        'Payment Form Testing',
        'Payment Tests',
        'manage_options',
        'payment-testing',
        'display_payment_testing_page',
        'dashicons-chart-line',
        30
    );
}
add_action('admin_menu', 'payment_testing_dashboard');

function display_payment_testing_page() {
    // Get test data from database
    $completion_rate = get_option('payment_form_completion_rate', 0);
    $average_time = get_option('payment_form_average_time', 0);
    $error_rate = get_option('payment_form_error_rate', 0);

    // Display dashboard
    ?>
    <div class="wrap">
        <h1>Payment Form Testing Data</h1>
        <div class="card">
            <h2>Key Metrics</h2>
            <ul>
                <li>Completion Rate: <?php echo esc_html($completion_rate); ?>%</li>
                <li>Average Completion Time: <?php echo esc_html($average_time); ?> seconds</li>
                <li>Error Rate: <?php echo esc_html($error_rate); ?>%</li>
            </ul>
        </div>

        <div class="card">
            <h2>Test Payment Gateway</h2>
            <button class="button button-primary" id="test-gateway">Run Gateway Test</button>
            <div id="test-results"></div>
        </div>
    </div>

    <script>
        document.getElementById('test-gateway').addEventListener('click', function() {
            fetch('<?php echo admin_url('admin-ajax.php'); ?>?action=test_payment_gateway')
                .then(response => response.text())
                .then(data => {
                    document.getElementById('test-results').innerHTML = data;
                });
        });
    </script>
    <?php
}
After testing, make necessary adjustments based on feedback. Common improvements include:
- Clearer error messages: Make validation errors more visible and descriptive
- Simplified fields: Remove unnecessary form fields that cause abandonment
- Mobile optimization: Enlarge touch targets and adjust spacing for small screens
- Progress indicators: Add visual steps for multi-part payment processes
This comprehensive testing approach ensures your manual gateway integration works reliably across all scenarios before going live with real transactions.
Advanced Customization Options
After creating a basic payment form, enhance it with advanced features that improve conversion rates and user experience.
Adding Conditional Logic
Make your form adapt to user choices with JavaScript-powered conditional logic:
document.addEventListener('DOMContentLoaded', function() {
    const paymentTypeSelect = document.getElementById('payment-type');
    const creditCardFields = document.getElementById('credit-card-fields');
    const paypalFields = document.getElementById('paypal-fields');

    function updatePaymentFields() {
        const selectedValue = paymentTypeSelect.value;

        if (selectedValue === 'credit-card') {
            creditCardFields.style.display = 'block';
            paypalFields.style.display = 'none';
        } else if (selectedValue === 'paypal') {
            creditCardFields.style.display = 'none';
            paypalFields.style.display = 'block';
        }
    }

    // Initial update
    updatePaymentFields();

    // Listen for changes
    paymentTypeSelect.addEventListener('change', updatePaymentFields);
});
Implement dynamic pricing calculations based on user selections:
function calculateTotal() {
    const basePrice = parseFloat(document.getElementById('base-price').value);
    const quantity = parseInt(document.getElementById('quantity').value);
    let total = basePrice * quantity;

    // Add options
    const selectedOptions = document.querySelectorAll('.product-option:checked');
    selectedOptions.forEach(function(option) {
        total += parseFloat(option.getAttribute('data-price'));
    });

    // Apply discount if present
    const discountCode = document.getElementById('discount-code').value;
    if (discountCode && validateDiscountCode(discountCode)) {
        const discountPercent = getDiscountPercent(discountCode);
        total = total * (1 - (discountPercent / 100));
    }

    // Format and display total
    document.getElementById('total-amount').textContent = '$' + total.toFixed(2);
    document.getElementById('payment-amount').value = total.toFixed(2);
}
Add a discount code system to incentivize purchases:
// Register discount codes in WordPress
function register_discount_codes_post_type() {
    register_post_type('discount_code', [
        'public' => false,
        'show_ui' => true,
        'labels' => [
            'name' => 'Discount Codes',
            'singular_name' => 'Discount Code'
        ],
        'supports' => ['title'],
        'menu_icon' => 'dashicons-tickets-alt'
    ]);

    // Add meta boxes
    add_meta_box(
        'discount_code_details',
        'Discount Details',
        'discount_code_meta_box',
        'discount_code',
        'normal',
        'high'
    );
}
add_action('init', 'register_discount_codes_post_type');

// Create meta box
function discount_code_meta_box($post) {
    $amount = get_post_meta($post->ID, '_discount_amount', true);
    $type = get_post_meta($post->ID, '_discount_type', true) ?: 'percent';
    $expiry = get_post_meta($post->ID, '_discount_expiry', true);

    ?>
    <p>
        <label>Discount Amount:</label>
        <input type="number" name="discount_amount" value="<?php echo esc_attr($amount); ?>" step="0.01" min="0" required>
    </p>
    <p>
        <label>Discount Type:</label>
        <select name="discount_type">
            <option value="percent" <?php selected($type, 'percent'); ?>>Percentage (%)</option>
            <option value="fixed" <?php selected($type, 'fixed'); ?>>Fixed Amount ($)</option>
        </select>
    </p>
    <p>
        <label>Expiry Date:</label>
        <input type="date" name="discount_expiry" value="<?php echo esc_attr($expiry); ?>">
    </p>
    <?php
}

// Save meta
function save_discount_code_meta($post_id) {
    if (defined('DOING_AUTOSAVE') && DOING_AUTOSAVE) return;
    if (!current_user_can('edit_post', $post_id)) return;

    // Save discount details
    if (isset($_POST['discount_amount'])) {
        update_post_meta($post_id, '_discount_amount', sanitize_text_field($_POST['discount_amount']));
    }

    if (isset($_POST['discount_type'])) {
        update_post_meta($post_id, '_discount_type', sanitize_text_field($_POST['discount_type']));
    }

    if (isset($_POST['discount_expiry'])) {
        update_post_meta($post_id, '_discount_expiry', sanitize_text_field($_POST['discount_expiry']));
    }
}
add_action('save_post_discount_code', 'save_discount_code_meta');

// AJAX validation for discount codes
function validate_discount_code() {
    $code = isset($_POST['code']) ? sanitize_text_field($_POST['code']) : '';

    if (empty($code)) {
        wp_send_json_error(['message' => 'No discount code provided']);
    }

    // Query for the code
    $args = [
        'post_type' => 'discount_code',
        'title' => $code,
        'posts_per_page' => 1,
        'exact' => true
    ];

    $query = new WP_Query($args);

    if ($query->have_posts()) {
        $query->the_post();
        $post_id = get_the_ID();
        $amount = get_post_meta($post_id, '_discount_amount', true);
        $type = get_post_meta($post_id, '_discount_type', true);
        $expiry = get_post_meta($post_id, '_discount_expiry', true);

        // Check if expired
        if (!empty($expiry) && strtotime($expiry) < current_time('timestamp')) {
            wp_send_json_error(['message' => 'This discount code has expired']);
        }

        // Valid code
        wp_send_json_success([
            'amount' => $amount,
            'type' => $type,
            'message' => sprintf(
                'Discount applied: %s%s off',
                $type === 'percent' ? $amount . '%' : '$' . $amount,
                ''
            )
        ]);
    } else {
        wp_send_json_error(['message' => 'Invalid discount code']);
    }
}
add_action('wp_ajax_validate_discount_code', 'validate_discount_code');
add_action('wp_ajax_nopriv_validate_discount_code', 'validate_discount_code');
Creating Multi-step Forms
Break complex payment forms into manageable steps with progress indicators:
<div class="payment-form-wrapper">
    <div class="payment-progress">
        <div class="progress-step active" id="step-1-indicator">1. Details</div>
        <div class="progress-step" id="step-2-indicator">2. Payment</div>
        <div class="progress-step" id="step-3-indicator">3. Confirmation</div>
    </div>

    <form id="multi-step-payment-form">
        <!-- Step 1: Customer Details -->
        <div class="form-step active" id="step-1">
            <h3>Your Details</h3>

            <div class="form-row">
                <label for="customer-name">Full Name</label>
                <input type="text" id="customer-name" name="customer-name" required>
            </div>

            <div class="form-row">
                <label for="customer-email">Email Address</label>
                <input type="email" id="customer-email" name="customer-email" required>
            </div>

            <div class="form-navigation">
                <button type="button" class="next-step">Continue to Payment</button>
            </div>
        </div>

        <!-- Step 2: Payment Details -->
        <div class="form-step" id="step-2">
            <h3>Payment Information</h3>

            <div class="form-row">
                <label for="payment-amount">Amount</label>
                <input type="number" id="payment-amount" name="payment-amount" min="1" step="0.01" required>
            </div>

            <div id="card-element">
                <!-- Stripe Card Element will be inserted here -->
            </div>

            <div class="form-navigation">
                <button type="button" class="prev-step">Back</button>
                <button type="button" class="next-step">Review Order</button>
            </div>
        </div>

        <!-- Step 3: Review & Confirm -->
        <div class="form-step" id="step-3">
            <h3>Review Your Payment</h3>

            <div class="order-summary">
                <p><strong>Name:</strong> <span id="summary-name"></span></p>
                <p><strong>Email:</strong> <span id="summary-email"></span></p>
                <p><strong>Amount:</strong> $<span id="summary-amount"></span></p>
            </div>

            <div class="form-navigation">
                <button type="button" class="prev-step">Edit Details</button>
                <button type="submit" id="submit-payment">Complete Payment</button>
            </div>
        </div>
    </form>
</div>
Add JavaScript to handle the multi-step navigation:
document.addEventListener('DOMContentLoaded', function() {
    const form = document.getElementById('multi-step-payment-form');
    const steps = form.querySelectorAll('.form-step');
    const nextButtons = form.querySelectorAll('.next-step');
    const prevButtons = form.querySelectorAll('.prev-step');
    const indicators = document.querySelectorAll('.progress-step');

    // Store form data between steps
    const formData = {};

    // Handle next button clicks
    nextButtons.forEach(button => {
        button.addEventListener('click', function() {
            const currentStep = this.closest('.form-step');
            const currentStepIndex = Array.from(steps).indexOf(currentStep);

            // Validate current step
            if (validateStep(currentStep)) {
                // Save data from current step
                saveStepData(currentStep);

                // Update summary if moving to last step
                if (currentStepIndex === 1) {
                    updateSummary();
                }

                // Hide current step
                currentStep.classList.remove('active');

                // Show next step
                steps[currentStepIndex + 1].classList.add('active');

                // Update indicators
                indicators[currentStepIndex].classList.remove('active');
                indicators[currentStepIndex + 1].classList.add('active');
            }
        });
    });

    // Handle previous button clicks
    prevButtons.forEach(button => {
        button.addEventListener('click', function() {
            const currentStep = this.closest('.form-step');
            const currentStepIndex = Array.from(steps).indexOf(currentStep);

            // Hide current step
            currentStep.classList.remove('active');

            // Show previous step
            steps[currentStepIndex - 1].classList.add('active');

            // Update indicators
            indicators[currentStepIndex].classList.remove('active');
            indicators[currentStepIndex - 1].classList.add('active');
        });
    });

    // Validate a single step
    function validateStep(step) {
        const inputs = step.querySelectorAll('input[required]');
        let valid = true;

        inputs.forEach(input => {
            if (!input.value.trim()) {
                input.classList.add('error');
                valid = false;
            } else {
                input.classList.remove('error');
            }
        });

        return valid;
    }

    // Save data from a step
    function saveStepData(step) {
        const inputs = step.querySelectorAll('input');

        inputs.forEach(input => {
            formData[input.name] = input.value;
        });
    }

    // Update summary information
    function updateSummary() {
        document.getElementById('summary-name').textContent = formData['customer-name'];
        document.getElementById('summary-email').textContent = formData['customer-email'];
        document.getElementById('summary-amount').textContent = formData['payment-amount'];
    }
});
Integrating with Other WordPress Features
Connect your payment form with other WordPress functionality for a seamless experience:
User Account Integration:
// Save payment history to user meta
function save_payment_to_user($user_id, $payment_data) {
    // Get existing payments
    $payments = get_user_meta($user_id, '_payment_history', true);

    if (!is_array($payments)) {
        $payments = [];
    }

    // Add new payment
    $payments[] = [
        'id' => $payment_data['id'],
        'amount' => $payment_data['amount'],
        'date' => current_time('mysql'),
        'status' => $payment_data['status']
    ];

    // Update user meta
    update_user_meta($user_id, '_payment_history', $payments);
}

// Display payment history on account page
function display_payment_history() {
    if (!is_user_logged_in()) {
        return;
    }

    $user_id = get_current_user_id();
    $payments = get_user_meta($user_id, '_payment_history', true);

    if (!is_array($payments) || empty($payments)) {
        echo '<p>No payment history available.</p>';
        return;
    }

    echo '<h3>Your Payment History</h3>';
    echo '<table class="payment-history">';
    echo '<thead><tr><th>ID</th><th>Amount</th><th>Date</th><th>Status</th></tr></thead>';
    echo '<tbody>';

    foreach ($payments as $payment) {
        echo '<tr>';
        echo '<td>' . esc_html($payment['id']) . '</td>';
        echo '<td>$' . esc_html($payment['amount']) . '</td>';
        echo '<td>' . esc_html(date('M j, Y', strtotime($payment['date']))) . '</td>';
        echo '<td>' . esc_html($payment['status']) . '</td>';
        echo '</tr>';
    }

    echo '</tbody></table>';
}
add_shortcode('payment_history', 'display_payment_history');
WordPress REST API Integration:
// Register REST API endpoint for payment status
function register_payment_api_routes() {
    register_rest_route('custom-payments/v1', '/status/(?P<id>\d+)', [
        'methods' => 'GET',
        'callback' => 'get_payment_status',
        'permission_callback' => function() {
            return current_user_can('read');
        }
    ]);
}
add_action('rest_api_init', 'register_payment_api_routes');

// Callback for payment status endpoint
function get_payment_status($request) {
    $payment_id = $request['id'];

    // Get payment post
    $payment = get_post($payment_id);

    if (!$payment || $payment->post_type !== 'payment_record') {
        return new WP_Error('not_found', 'Payment not found', ['status' => 404]);
    }

    // Check if user has permission
    $payment_email = get_post_meta($payment_id, 'payment_email', true);
    $current_user = wp_get_current_user();

    if ($current_user->user_email !== $payment_email && !current_user_can('edit_payment_records')) {
        return new WP_Error('forbidden', 'You do not have permission to view this payment', ['status' => 403]);
    }

    // Return payment data
    return [
        'id' => $payment_id,
        'date' => $payment->post_date,
        'amount' => get_post_meta($payment_id, 'payment_amount', true),
        'status' => get_post_meta($payment_id, 'payment_status', true),
        'transaction_id' => get_post_meta($payment_id, 'payment_transaction_id', true)
    ];
}
Maintaining Your Custom Payment Form
Custom payment forms require ongoing maintenance to ensure security and functionality.
Regular Updates and Checks
Create a maintenance schedule for your custom payment form:
- Weekly: Test transactions with sandbox accounts
- Monthly: Check for payment gateway API changes
- Quarterly: Perform security audits and code reviews
- Annually: Renew SSL certificates and review PCI compliance
Add this code to detect payment gateway API changes:
function check_stripe_api_version() {
    // Current API version we're using
    $current_version = '2020-08-27';

    try {
        require_once plugin_dir_path(__FILE__) . 'vendor/autoload.php';
        \Stripe\Stripe::setApiKey('sk_test_your_key');

        // Get latest API version
        $account = \Stripe\Account::retrieve();
        $latest_version = \Stripe\Stripe::getApiVersion();

        // Compare versions
        if ($current_version !== $latest_version) {
            // Log warning about version mismatch
            error_log("Stripe API version mismatch: Using $current_version but latest is $latest_version");

            // Send admin notification
            $admin_email = get_option('admin_email');
            wp_mail(
                $admin_email,
                'Payment Gateway API Update Required',
                "Your payment form is using Stripe API version $current_version, but the latest version is $latest_version. Please review your code for compatibility."
            );
        }
    } catch (Exception $e) {
        error_log('Error checking Stripe API version: ' . $e->getMessage());
    }
}
add_action('admin_init', 'check_stripe_api_version');
Optimize performance by cleaning up old payment records:
function cleanup_old_payment_logs() {
    // Delete logs older than 90 days
    $log_dir = WP_CONTENT_DIR . '/payment-logs/';

    if (!is_dir($log_dir)) {
        return;
    }

    $files = scandir($log_dir);
    $now = time();

    foreach ($files as $file) {
        if ($file === '.' || $file === '..') {
            continue;
        }

        $file_path = $log_dir . $file;

        // Check if file is older than 90 days
        if (filemtime($file_path) < ($now - 90 * DAY_IN_SECONDS)) {
            @unlink($file_path);
        }
    }
}
add_action('wp_scheduled_delete', 'cleanup_old_payment_logs');
Monitoring Payment Activity
Create a custom dashboard for monitoring payment activities:
function payment_monitoring_dashboard() {
    add_menu_page(
        'Payment Monitor',
        'Payment Monitor',
        'manage_options',
        'payment-monitor',
        'display_payment_dashboard',
        'dashicons-chart-bar',
        30
    );
}
add_action('admin_menu', 'payment_monitoring_dashboard');

function display_payment_dashboard() {
    // Get payment statistics
    $stats = get_payment_statistics();

    ?>
    <div class="wrap">
        <h1>Payment Monitoring Dashboard</h1>

        <div class="payment-stats-grid">
            <div class="stat-box">
                <h3>Today's Payments</h3>
                <div class="stat-value"><?php echo esc_html($stats['today_count']); ?></div>
                <div class="stat-amount">$<?php echo esc_html($stats['today_amount']); ?></div>
            </div>

            <div class="stat-box">
                <h3>This Month</h3>
                <div class="stat-value"><?php echo esc_html($stats['month_count']); ?></div>
                <div class="stat-amount">$<?php echo esc_html($stats['month_amount']); ?></div>
            </div>

            <div class="stat-box">
                <h3>Total Payments</h3>
                <div class="stat-value"><?php echo esc_html($stats['total_count']); ?></div>
                <div class="stat-amount">$<?php echo esc_html($stats['total_amount']); ?></div>
            </div>

            <div class="stat-box">
                <h3>Failed Payments (Last 30 Days)</h3>
                <div class="stat-value"><?php echo esc_html($stats['failed_count']); ?></div>
            </div>
        </div>

        <h2>Recent Payments</h2>
        <?php display_recent_payments(); ?>
    </div>

    <style>
        .payment-stats-grid {
            display: grid;
            grid-template-columns: repeat(auto-fill, minmax(250px, 1fr));
            gap: 20px;
            margin-bottom: 30px;
        }

        .stat-box {
            background: #fff;
            border: 1px solid #e2e4e7;
            padding: 20px;
            border-radius: 5px;
            box-shadow: 0 1px 3px rgba(0,0,0,0.05);
        }

        .stat-value {
            font-size: 36px;
            font-weight: 600;
            color: #1e1e1e;
        }

        .stat-amount {
            font-size: 18px;
            color: #757575;
        }
    </style>
    <?php
}

function get_payment_statistics() {
    global $wpdb;

    $today = date('Y-m-d');
    $month_start = date('Y-m-01');
    $thirty_days_ago = date('Y-m-d', strtotime('-30 days'));

    // Calculate stats from payment_record posts and meta
    $today_payments = $wpdb->get_results(
        $wpdb->prepare(
            "SELECT ID FROM {$wpdb->posts}
            WHERE post_type = 'payment_record'
            AND post_date >= %s",
            $today
        )
    );

    $month_payments = $wpdb->get_results(
        $wpdb->prepare(
            "SELECT ID FROM {$wpdb->posts}
            WHERE post_type = 'payment_record'
            AND post_date >= %s",
            $month_start
        )
    );

    $total_payments = $wpdb->get_var(
        "SELECT COUNT(*) FROM {$wpdb->posts}
        WHERE post_type = 'payment_record'"
    );

    $failed_payments = $wpdb->get_var(
        $wpdb->prepare(
            "SELECT COUNT(*) FROM {$wpdb->posts} p
            JOIN {$wpdb->postmeta} pm ON p.ID = pm.post_id
            WHERE p.post_type = 'payment_record'
            AND p.post_date >= %s
            AND pm.meta_key = 'payment_status'
            AND pm.meta_value = 'failed'",
            $thirty_days_ago
        )
    );

    // Calculate amounts
    $today_amount = 0;
    $month_amount = 0;
    $total_amount = 0;

    foreach ($today_payments as $payment) {
        $amount = get_post_meta($payment->ID, 'payment_amount', true);
        $today_amount += floatval($amount);
    }

    foreach ($month_payments as $payment) {
        $amount = get_post_meta($payment->ID, 'payment_amount', true);
        $month_amount += floatval($amount);
    }

    $all_payments = $wpdb->get_results(
        "SELECT ID FROM {$wpdb->posts}
        WHERE post_type = 'payment_record'"
    );

    foreach ($all_payments as $payment) {
        $amount = get_post_meta($payment->ID, 'payment_amount', true);
        $total_amount += floatval($amount);
    }

    return [
        'today_count' => count($today_payments),
        'today_amount' => number_format($today_amount, 2),
        'month_count' => count($month_payments),
        'month_amount' => number_format($month_amount, 2),
        'total_count' => $total_payments,
        'total_amount' => number_format($total_amount, 2),
        'failed_count' => $failed_payments
    ];
}

function display_recent_payments() {
    $args = [
        'post_type' => 'payment_record',
        'posts_per_page' => 10,
        'orderby' => 'date',
        'order' => 'DESC'
    ];

    $payments = new WP_Query($args);

    if (!$payments->have_posts()) {
        echo '<p>No payments found.</p>';
        return;
    }

    ?>
    <table class="wp-list-table widefat fixed striped">
        <thead>
            <tr>
                <th>ID</th>
                <th>Date</th>
                <th>Customer</th>
                <th>Amount</th>
                <th>Status</th>
                <th>Transaction ID</th>
            </tr>
        </thead>
        <tbody>
            <?php while ($payments->have_posts()) : $payments->the_post(); ?>
                <tr>
                    <td><?php the_ID(); ?></td>
                    <td><?php echo get_the_date(); ?></td>
                    <td>
                        <?php
                        $email = get_post_meta(get_the_ID(), 'payment_email', true);
                        echo esc_html($email);
                        ?>
                    </td>
                    <td>
                        $<?php echo esc_html(get_post_meta(get_the_ID(), 'payment_amount', true)); ?>
                    </td>
                    <td>
                        <?php
                        $status = get_post_meta(get_the_ID(), 'payment_status', true);
                        $status_class = $status === 'completed' ? 'status-completed' : ($status === 'failed' ? 'status-failed' : 'status-pending');
                        echo '<span class="payment-status ' . esc_attr($status_class) . '">' . esc_html($status) . '</span>';
                        ?>
                    </td>
                    <td>
                        <?php echo esc_html(get_post_meta(get_the_ID(), 'payment_transaction_id', true)); ?>
                    </td>
                </tr>
            <?php endwhile; ?>
        </tbody>
    </table>

    <style>
        .payment-status {
            display: inline-block;
            padding: 2px 8px;
            border-radius: 3px;
            font-size: 12px;
        }

        .status-completed {
            background: #d1fae5;
            color: #065f46;
        }

        .status-failed {
            background: #fee2e2;
            color: #b91c1c;
        }

        .status-pending {
            background: #fef3c7;
            color: #92400e;
        }
    </style>
    <?php

    wp_reset_postdata();
}
Troubleshooting Common Issues
Create a troubleshooting guide for common payment form issues:
function payment_troubleshooting_guide() {
    // Only show to admins
    if (!current_user_can('manage_options')) {
        return;
    }

    add_menu_page(
        'Payment Troubleshooting',
        'Payment Help',
        'manage_options',
        'payment-help',
        'display_troubleshooting_guide',
        'dashicons-editor-help',
        31
    );
}
add_action('admin_menu', 'payment_troubleshooting_guide');

function display_troubleshooting_guide() {
    ?>
    <div class="wrap">
        <h1>Payment Form Troubleshooting</h1>

        <div class="troubleshooting-section">
            <h2>API Connection Issues</h2>
            <p>If your payment gateway connections are failing:</p>
            <ol>
                <li>Verify your API keys in settings</li>
                <li>Check if your SSL certificate is valid and not expired</li>
                <li>Test API connection with this diagnostic tool:</li>
            </ol>

            <button id="test-api-connection" class="button button-primary">Test API Connection</button>
            <div id="api-connection-results"></div>

            <script>
                document.getElementById('test-api-connection').addEventListener('click', function() {
                    const results = document.getElementById('api-connection-results');
                    results.innerHTML = '<p>Testing connection...</p>';

                    fetch('<?php echo admin_url('admin-ajax.php'); ?>?action=test_payment_api_connection')
                        .then(response => response.json())
                        .then(data => {
                            if (data.success) {
                                results.innerHTML = '<p class="success-message">Connection successful! API version: ' + data.version + '</p>';
                            } else {
                                results.innerHTML = '<p class="error-message">Connection failed: ' + data.error + '</p>';
                            }
                        })
                        .catch(error => {
                            results.innerHTML = '<p class="error-message">Error testing connection: ' + error.message + '</p>';
                        });
                });
            </script>
        </div>

        <div class="troubleshooting-section">
            <h2>Form Submission Errors</h2>
            <p>If users report form submission errors:</p>
            <ol>
                <li>Check browser console logs for JavaScript errors</li>
                <li>Verify form nonce is working correctly</li>
                <li>Test form with different browsers</li>
                <li>Check server error logs for PHP errors</li>
            </ol>

            <h3>Recent Form Errors</h3>
            <?php display_recent_form_errors(); ?>
        </div>

        <div class="troubleshooting-section">
            <h2>Payment Failures</h2>
            <p>Common reasons for payment failures:</p>
            <ol>
                <li>Insufficient funds or card declined</li>
                <li>3D Secure authentication failed
How to Secure a WordPress Payment Form
People hand over credit card numbers through your form. Security isn’t optional here. The good news is that modern WordPress payment plugins offload most of the heavy lifting to the payment gateway. But your site still needs to hold up its end.
Baymard Institute data from 2024 shows 25% of US shoppers have abandoned a purchase because they didn’t trust the site with their card information. That’s one in four potential customers lost because of perceived (not even actual) security issues.
SSL Certificates
Every WordPress site collecting payment data needs HTTPS. Period. Stripe won’t even load its card fields on an HTTP page.
Most hosting providers now include free SSL certificates through Let’s Encrypt. Bluehost, SiteGround, DreamHost, Kinsta, and Hostinger all offer automatic SSL activation. There are over 250 million domains using Let’s Encrypt certificates globally (Kinsta, 2026).
If you see a padlock in the browser bar, you’re covered. If not, check your hosting control panel or install a plugin like Really Simple SSL to handle the redirect.
Anti-Spam and Bot Protection
Google reCAPTCHA: adds a challenge step that bots fail. Most WordPress form plugins include reCAPTCHA integration.
Honeypot fields: invisible form fields that real users never fill out. If a bot fills the hidden field, the submission gets blocked. WPForms and Gravity Forms both have built-in honeypot toggles.
Rate limiting and IP blocking are additional layers. Some form security setups also include geolocation filters to restrict submissions by country.
Keeping Everything Updated
WordPress core vulnerabilities caused 92% of security issues in 2025 to trace back to outdated plugins, according to GrowthScribe data. Payment plugins are especially high-risk targets.
- Update WordPress core, your form plugin, and PHP regularly
- Remove unused plugins and themes
- Avoid any plugin that stores raw card numbers in your WordPress database
The PCI Security Standards Council updated to PCI DSS v4.0 with full enforcement as of March 2025. For most WordPress sites using tokenized plugins, the practical impact is minimal. But staying current with updates is how you stay compliant without even thinking about it.
Common Problems with WordPress Payment Forms and How to Fix Them
Every WordPress payment form will break at some point. The question is whether you can fix it in five minutes or five hours. Here are the issues that come up the most, along with what actually fixes them.
Payment Form Not Showing Up
This is almost always a JavaScript conflict. A caching plugin strips the Stripe.js script from the page, or another plugin loads an older version of the Stripe library that breaks the form.
Fix it:
- Exclude your payment page from any caching plugin (WP Super Cache, W3 Total Cache, LiteSpeed Cache)
- Disable all plugins except your form plugin, then reactivate them one by one until the conflict appears
- Switch to a default WordPress theme (Twenty Twenty-Five) to rule out theme conflicts
WooCommerce documentation confirms that Stripe’s payment form relies on the get_header action in WordPress. If your theme loads headers in a non-standard way, the payment fields won’t render.
Payments Failing in Live Mode but Working in Test Mode
The cause, nine times out of ten: you’re still using test API keys in the plugin settings after switching Stripe out of test mode. Or the reverse: live keys are set in the plugin, but your Stripe dashboard is still in test mode.
Go to your Stripe dashboard, toggle to “Live mode,” and copy the Publishable Key and Secret Key. Then paste them into your form plugin’s payment settings. Make sure the “Test Mode” toggle in the plugin is turned off.
Form Submits but No Payment Collected
The form goes through. The user sees a confirmation. But no charge appears in Stripe. This usually means the payment gateway addon isn’t activated, or the Stripe card field wasn’t properly mapped to the form.
Check that your plugin’s Stripe addon is active under the Addons page. Then open the form editor and confirm that a Stripe credit card field is actually present in the form, not just standard text fields.
Email Confirmations Not Sending
WordPress uses the PHP mail() function by default, and most hosting providers throttle or block it. Payment confirmation emails that never arrive are a trust killer.
Install an SMTP plugin like WP Mail SMTP and connect it to a real email service (Gmail SMTP, SendGrid, Mailgun). Make sure emails are routing through a proper SMTP relay instead of the default PHP mailer.
Currency Mismatch Errors
Your form plugin says “USD” but your Stripe account is set to GBP. Or the other way around. The payment fails silently, or throws a vague error that doesn’t point to the real problem.
Match the currency setting in three places: your Stripe dashboard, your form plugin’s payment settings, and (if you’re using WooCommerce for anything) the WooCommerce general settings. All three need to agree, or the gateway rejects the charge.
One Business Bloomer case study found that a corrupted database entry had replaced the currency code with an unrelated string, causing Stripe forms to fail across the entire site. The fix was a single database correction.
FAQ on WordPress Payment Forms
What is a WordPress payment form?
A WordPress payment form is an embedded form on your site that collects payment details and processes transactions through a gateway like Stripe or PayPal. It works without needing a full ecommerce store or shopping cart setup.
Do I need WooCommerce to accept payments on WordPress?
No. Plugins like WPForms, WP Simple Pay, and Gravity Forms let you collect payments directly through a simple form. WooCommerce is only needed if you want a full online store with product pages and cart functionality.
Which is the best plugin for WordPress payment forms?
WPForms is the most popular option with over 6 million installations. WP Simple Pay is best for Stripe-only setups. Gravity Forms suits complex pricing workflows. Your choice depends on your gateway and form complexity needs.
How much does it cost to add a payment form to WordPress?
Free options exist. WPForms Lite and WP Simple Pay both have free versions. Paid plans start around $49.50 per year. On top of that, Stripe charges 2.9% + $0.30 per transaction as a gateway processing fee.
Is it safe to collect credit card payments through WordPress?
Yes, when using a plugin with tokenized payment processing. The card data goes directly to Stripe or PayPal, not your WordPress database. You still need an SSL certificate and should keep all plugins updated for PCI compliance.
Can I accept recurring payments with a WordPress form?
Yes. WP Simple Pay, WPForms with the Stripe Pro addon, and Gravity Forms all support recurring billing. You can set weekly, monthly, or yearly intervals and let customers manage their own subscriptions through Stripe’s portal.
Do I need an SSL certificate for a payment form?
Absolutely. Stripe won’t load its card fields on an HTTP page. Most WordPress hosting providers include free SSL through Let’s Encrypt. Check your hosting control panel to activate it if it’s not already enabled.
Why is my WordPress payment form not showing up?
Usually a JavaScript conflict caused by a caching plugin or theme incompatibility. Exclude your payment page from caching, disable other plugins one by one, and switch to a default WordPress theme to isolate the problem.
Can I create a payment form without a plugin?
Yes. You can embed Stripe Payment Links or PayPal buttons directly into a WordPress page using HTML. Third-party platforms like Jotform also offer embeddable forms. You lose customization, but avoid adding another plugin.
What payment gateways work with WordPress form plugins?
Stripe has the widest WordPress plugin support, followed by PayPal. Square and Authorize.net work with select plugins. For specific regions, gateways like Razorpay and Mollie offer better local payment method coverage.
Conclusion
A WordPress payment form removes the complexity of accepting online payments. You don’t need a full ecommerce platform to charge for a service, collect a registration fee, or process a monthly subscription.
The right plugin and gateway combination handles the technical side. Stripe Elements keeps card data off your server. Tokenization and SSL encryption protect your customers. And tools like WPForms or WP Simple Pay get you from setup to live checkout in under 15 minutes.
Focus on keeping your form fields minimal, your payment confirmation clear, and your plugins updated. Test in Stripe test mode before going live.
If you want to optimize forms further, look at reducing field count, adding trust signals near your checkout button, and reviewing your checkout optimization strategy. Small tweaks to form UX design often move the needle more than switching plugins.
Keep it simple. Collect the payment. Move on to what your business actually does.

