The Password field is available only in the Pro version of IvyForms.
The Password field is designed for forms that need to collect secure, hidden input. While IvyForms does not yet include built-in user registration templates or account logic, the Password field is available for advanced use cases where developers or site owners want to collect a masked value that is saved in a hashed format. This article explains how the field works and which settings can be configured in the builder.
Front-end appearance
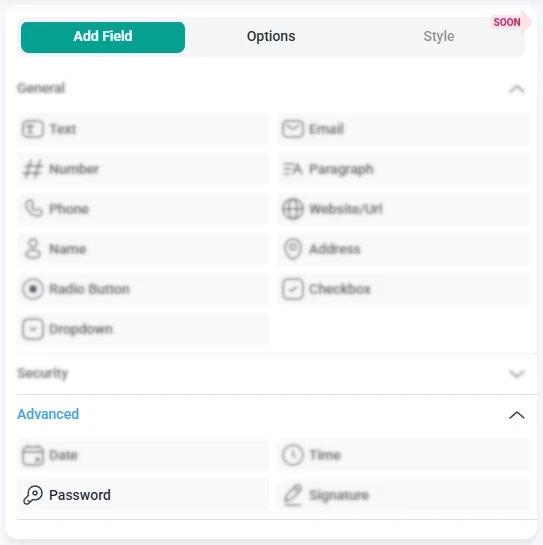
Where can I find the password field in IvyForms?
You can add the Password field from the Advanced section in the left panel of the IvyForms builder. When this section is expanded, the Password field appears next to Date, Time, and Signature. Click it once to add it to your form, then select the field in the preview to access its settings.
What settings can I configure for the password field?
When you click the Password field inside the preview, the sidebar switches to the Options view. Here you can adjust settings in the General, Advanced, and Smart logic sections, depending on how you want users to enter and confirm their passwords.
How do general settings work for the password field?
The General tab contains the essential configuration options for the Password field. These options control the label, visibility icon, confirmation settings, and how users interact with the field on the front-end.
Label – sets the name displayed above the password field, such as “Password” or “Create a password”.
Hide label – removes the label from the front-end while keeping the field active.
Description – adds optional helper text beneath the password input.
Show password icon – displays an eye icon on the right side of the field. Users can click it to toggle between hidden characters (●●●●●) and visible text.
Required – makes the password a mandatory field before form submission.
Read-only – prevents editing the password. This option is only available when password confirmation is disabled.
Placeholder – adds example text inside the password input, such as “Enter your password”.
CSS classes – lets you attach custom class names for styling.
Enable password confirmation – adds a second confirmation field so users must re-enter the password to ensure both values match.
When password confirmation is enabled, three additional settings appear:
Password confirmation label – sets the label for the second field (e.g. “Confirm password”).
Hide confirmation label – hides the label for the confirmation input on the front-end.
Password confirmation placeholder – adds a placeholder to the confirmation field.
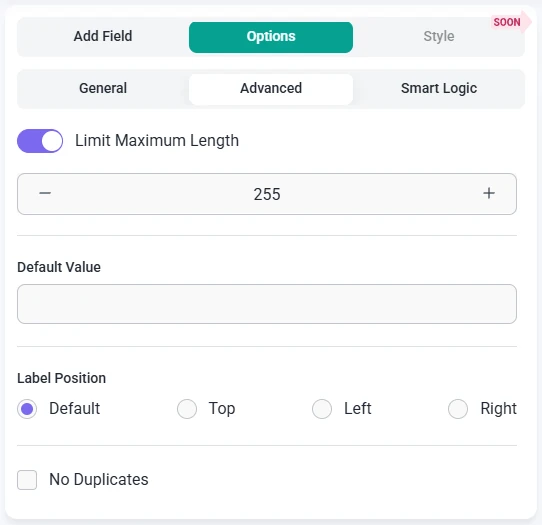
How do advanced settings work for the password field?
The Advanced tab includes settings for maximum length, default values, and label placement. These options allow additional control over how the Password field behaves in more structured form layouts.
Limit maximum length – restricts the maximum number of characters allowed in the password field.
Default value – sets an initial value inside the field. While uncommon for passwords, this option is available for advanced cases or developer-driven implementations.
Label position – changes where the label appears in relation to the password field. You can choose Default, Top, Left, or Right.
No duplicates – prevents the same password value from being submitted more than once in the same form. This can be useful in multi-field configurations.
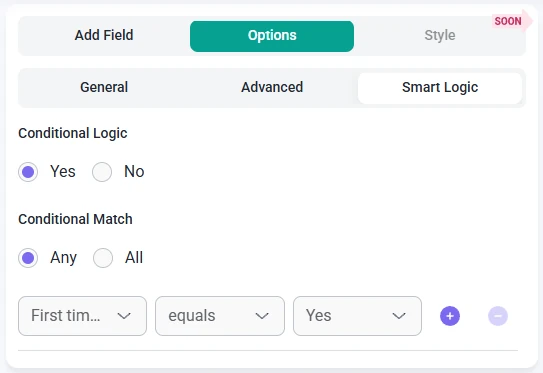
How can I use smart logic with the password field?
Smart Logic is available only in the Pro version of IvyForms.
The Smart logic settings allow you to show or hide the Password field based on conditions created from other fields in the form. Smart logic is turned off by default. Once enabled, you can define rules that determine exactly when the Password field should appear.
After enabling smart logic, the Conditional match control becomes available and lets you choose how rules are evaluated:
Any – the Password field appears if at least one of the defined conditions is true.
All – the Password field appears only when all defined conditions are met at the same time.
This makes it possible to show the Password field only when needed — for example, after users select an option that requires account creation, or when a custom workflow calls for password-based access.
Guides
Explore the IvyForms documentation through key sections like Get Started,
Form Creation, Entry Management, Settings, Integrations, Advanced Features,
and Support & Troubleshooting to make the most of your form-building experience