


Most WordPress sites reach for a plugin the moment they need a contact form. It works, but it is not the only way. You can create forms in WordPress without…
Table of contents
Every event starts with a form. A WordPress event registration form is how you turn page visitors into confirmed attendees, collect the data you need, and process payments without sending people off to a third-party platform.
But most registration forms lose people before they finish. Too many fields, broken mobile layouts, no confirmation email. The form itself becomes the bottleneck.
This guide covers how to build event registration forms in WordPress using plugins like WPForms, The Events Calendar, and Gravity Forms. You’ll also learn how to add payment integration through Stripe and WooCommerce, set up attendee communication, export registration data, and avoid the common mistakes that kill completion rates.
Whether you’re running a paid conference or a free workshop signup, the setup matters more than most people think.
What Is a WordPress Event Registration Form
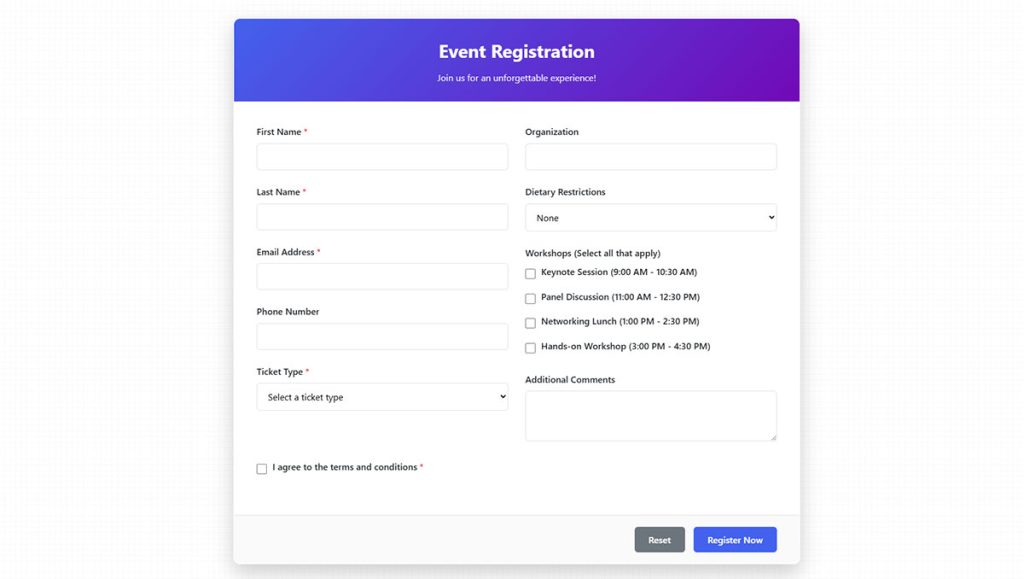
A WordPress event registration form is a front-end form embedded on a WordPress site that collects attendee details for a specific event. Name, email, ticket type, number of guests, dietary needs, session preferences. That’s the typical field setup.
It’s not a contact form. And it’s not a generic RSVP widget. A registration form goes deeper. It captures structured data tied to a specific date, venue, and capacity limit.
These forms usually live on event landing pages, though you’ll also see them in sidebar widgets, embedded in blog posts, or triggered as popup forms.
WordPress powers 43.4% of all websites globally, according to W3Techs. That’s over 500 million sites. A huge chunk of those run events of some kind, from local workshops to paid conferences.
The event management software market hit $8.4 billion in 2024 (Grand View Research). But plenty of WordPress site owners skip those platforms entirely. They build their own registration flow using form plugins and payment gateways, keeping everything on their own domain.
Why? Control. You own the data, you own the branding, and you don’t pay per-ticket fees to a third party like Eventbrite. For small to mid-size events, a well-built WordPress form does the job without the overhead.
Core Fields in a Standard Event Registration Form
Attendee identity: Full name, email address, phone number (optional).
Event-specific selections: Ticket tier, session preferences, workshop track, number of attendees in a group.
Logistics: Dietary restrictions, accessibility needs, parking requirements.
Payment: Ticket price, discount codes, payment method selection (Stripe, PayPal).
The best form fields depend on the event. A free neighborhood meetup needs three fields max. A paid two-day conference might need fifteen, spread across a multi-step form to keep people from bouncing.
When You Actually Need a Registration Form vs. a Simple RSVP
Not every event needs a full registration form. Some need a yes-or-no RSVP. Knowing the difference saves you from overbuilding (and scaring off attendees with unnecessary fields).
Zuko Analytics data shows that 67% of site visitors will abandon a form permanently if they hit complications. Every extra field is a potential exit point.
RSVP Is Enough When…
- The event is free and informal (neighborhood BBQ, casual meetup)
- You only need a headcount, not detailed attendee data
- There’s no ticketing, no session selection, no payment involved
A simple RSVP collects a name and email. Maybe a plus-one count. That’s it.
A Registration Form Makes Sense When…
You need more than a headcount. Paid conferences, multi-session workshops, events with capacity limits or dietary accommodations. These all require structured data collection.
If you’re selling tickets, you need payment integration. If you’re running parallel sessions, you need conditional logic to show relevant options based on what the attendee selects.
GoToWebinar research found that registration forms with five or fewer fields convert 10% better than longer ones. So even when you need a full registration form, keep it tight.
| Scenario | Best Approach | Typical Fields |
|---|---|---|
| Free local meetup | Simple RSVP | Name, email, headcount |
| Paid workshop | Registration form | Name, email, ticket type, payment |
| Multi-day conference | Multi-step registration | Identity, sessions, meals, payment, accessibility |
| Recurring class series | Registration + calendar sync | Name, email, dates selected, payment |
When to Use a Third-Party Platform Instead
If you’re running a 5,000-person conference with complex ticketing tiers, allocated seating, and on-site check-in with QR codes, a self-hosted WordPress form probably isn’t the right tool. Platforms like Cvent or Eventbrite handle that scale better.
But for events under 500 attendees? A WordPress registration form with Stripe or PayPal integration handles it fine. You keep attendees on your site, you control the design, and you avoid per-ticket platform fees that add up fast.
Best WordPress Plugins for Event Registration Forms
The plugin you pick shapes everything. How many fields you can add, whether you get payment processing, how attendee data gets stored and exported. Pick wrong and you’ll be fighting the tool instead of building your event page.
Almost 50% of marketers say web forms are their highest-converting lead generation tool, according to HubSpot. That stat holds for event registration too. The form is where commitment happens.
Free vs. Premium Plugin Options
Free plugins get you started but they hit walls fast. WPForms Lite, for example, lets you build basic forms. But payment integration, conditional logic in a form builder, and entry management? Those require the Pro plan.
The Events Calendar offers a free tier for displaying events. But collecting custom attendee fields and processing paid ticket sales needs Event Tickets Plus, which is a premium add-on.
What you lose without premium:
- Payment gateways (Stripe, PayPal, Square)
- Conditional field logic for session-based events
- CSV export of attendee lists
- Email marketing integrations (Mailchimp, FluentCRM)
Gravity Forms has no free version at all. You’re paying from day one. But it’s one of the most flexible options for complex registration setups, especially if you need calculated pricing or advanced routing.
Plugin Comparison by Event Type
| Plugin | Best For | Payment Support | Conditional Logic |
|---|---|---|---|
| WPForms Pro | Single-day workshops, simple paid events | Stripe, PayPal, Square | Yes |
| The Events Calendar + Event Tickets Plus | Multi-day conferences with calendar display | WooCommerce, Stripe | Limited |
| Gravity Forms | Complex registrations with calculated pricing | Stripe, PayPal, Authorize.Net | Advanced |
| WP Event Manager | Recurring classes, job fair registrations | WooCommerce | Basic |
| Eventin | Virtual and hybrid events | WooCommerce, Stripe | Yes |
Fluent Forms is worth a look too, especially if budget is tight. It sits between WPForms Lite and Gravity Forms in terms of capability, and the pricing is lower than most competitors.
For sites already running WooCommerce, FooEvents or WooCommerce Box Office plug directly into the existing store infrastructure. Your event tickets become products. Inventory management, discount codes, and order tracking all work through WooCommerce’s built-in system.
How to Build a Registration Form With WPForms
WPForms is the most commonly used WordPress form builder, with over 6 million active installations. The drag-and-drop interface is straightforward, and the event registration template saves a lot of setup time.
Here’s the process, start to finish.
Setting Up the Basic Form
Step 1: Install WPForms and activate it. Go to WPForms > Add New in your WordPress dashboard.
Step 2: Search for “event registration” in the template library. WPForms has over 2,000 templates. Click “Use Template” to load one.
Step 3: The template comes pre-loaded with fields for name, email, address, phone, and a multiple-choice field for event options. Delete what you don’t need. Add what’s missing.
Keep it lean. HubSpot data shows the average number of form fields across all industries is five. That number tends to produce the best completion rates.
You can embed the finished form on any page using the WPForms block in the Gutenberg editor, a shortcode, or a widget. Takes about 30 seconds.
Adding Payment Fields for Paid Events
This is where WPForms Pro earns its price. Go to WPForms > Addons and install the Stripe or PayPal addon.
Once connected, add a “Stripe Credit Card” field to your form. Set up ticket pricing using dropdown or radio button fields. The payment section only appears when a paid ticket option is selected, which you control through conditional logic.
Discount codes are tricky in WPForms. There’s no native coupon field. You can work around it with a single-line text field plus conditional logic that adjusts the total, but it’s not as smooth as a dedicated ticketing system. For heavy coupon usage, look at WooCommerce-based solutions instead.
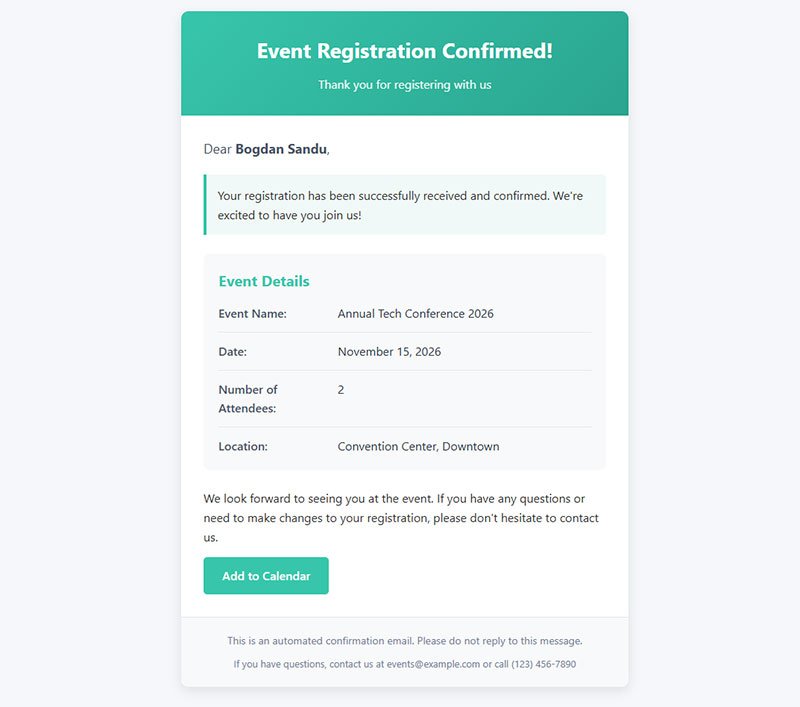
After the form is live, configure your form submission confirmation message to show attendees a thank-you note with event details, a calendar link, and any next steps. Don’t leave them staring at a blank page after they pay you.
How to Build a Registration Form With The Events Calendar
The Events Calendar is the most popular WordPress event management plugin. It’s built specifically for listing and managing events, which gives it a different starting point than general-purpose form builders like WPForms or Gravity Forms.
If your site already uses The Events Calendar to display upcoming events, adding registration functionality through Event Tickets makes sense. Everything stays in one ecosystem.
Setting Up Event Tickets
Install The Events Calendar (free) plus Event Tickets (free for RSVPs and basic tickets). For custom attendee fields and advanced ticketing, you’ll need Event Tickets Plus (paid).
Create a new event in the WordPress editor. Below the event details, you’ll see an “RSVP & Tickets” meta box. Add a ticket type, set the price, define a capacity limit, and publish.
The ticket form renders directly on the event page. Attendees see the event description, date, venue map, and the registration form all in one place. No separate form page needed.
Custom Attendee Fields With Event Tickets Plus
The free version of Event Tickets collects name and email. That’s it. Event Tickets Plus adds custom fields, so you can ask about dietary needs, session preferences, t-shirt sizes, or anything else specific to your event.
It also integrates with WooCommerce for payment processing. Tickets become WooCommerce products. That means you get WooCommerce’s full checkout optimization toolkit: cart recovery emails, coupon codes, order management, and detailed sales reporting.
ON24’s 2025 benchmark report found that 57% of B2B webinar registrations convert to actual attendees. For in-person events, that number is usually higher. But the gap between registration and attendance is real, and your post-registration communication strategy matters just as much as the form itself.
Managing RSVPs vs. Paid Tickets
The Events Calendar handles both on the same event page. You can offer a free RSVP option alongside paid ticket tiers. Early bird pricing, VIP packages, group rates. All configurable within the ticket meta box.
One thing to watch: capacity management. Set your ticket limits carefully. Unlike Eventbrite, there’s no automatic waitlist feature in the free version. If you oversell, you’ll find out the hard way.
Custom Registration Forms Without a Plugin
Sometimes a plugin adds more complexity than it removes. If you’re comfortable with PHP and HTML, building a custom event registration form gives you total control over fields, layout, and data handling.
This approach makes sense when your registration flow requires logic that no plugin handles neatly. Unique pricing tiers, integration with a proprietary CRM, or a design that doesn’t fit inside any template.
The HTML and PHP Approach

Build your form with standard HTML. Process submissions with a custom function hooked into WordPress via functions.php or a small custom plugin.
A basic flow looks like this:
- Create the form markup on a page template
- Use
wpnoncefield()for form security - Hook into
adminpost{action}to process the submission - Store registrations as a custom post type with meta fields
- Trigger a confirmation email using
wpmail()
Advanced Custom Fields (ACF) speeds up the meta field setup. You define your registration data structure in the ACF interface, then query it on the front end or in the admin dashboard however you want.
Using the WordPress REST API
For headless setups or JavaScript-heavy front ends, the REST API is the better route. Build a React or Vue front-end form component that sends a POST request to a custom REST endpoint.
The endpoint validates the data, creates a post, sends the email, and returns a response. Clean separation between the form UI and the data layer.
When to go custom: You have a developer on the team, your event registration logic is unusual, or you’re building a platform that hosts many events with different organizers. If none of those apply, a plugin is faster and safer.
Zuko Analytics data shows the average form completion rate across industries is about 51.7%. Custom-built forms can beat that number when they’re purpose-built for a specific audience and stripped of unnecessary fields. But they can also perform worse if the developer skips basics like form validation, mobile responsiveness, or clear error messaging.
Speaking of mobile, desktop users complete forms at a 55.5% starter-to-completion rate versus 47.5% on mobile (Zuko Analytics). Took me a while to accept this, but testing your registration form on a phone first is more important than testing on desktop. Most of your traffic is probably coming from mobile anyway.
Payment Integration and Ticket Management
Collecting money through a WordPress event registration form comes down to two paths: a form plugin with a built-in payment gateway, or WooCommerce handling the entire checkout. Your event size and ticket complexity decide which one fits.
Stripe charges 2.9% + $0.30 per transaction in the US. PayPal’s standard rate is similar. Neither charges monthly fees. That’s a much better deal than Eventbrite’s per-ticket fees, which is why so many WordPress site owners handle payments themselves.
Direct Payment Gateways Through Form Plugins
WPForms, Gravity Forms, and Fluent Forms all connect directly to Stripe and PayPal. You add a credit card field, connect your account, and you’re live.
What works well: Simple ticket sales. One event, one or two ticket tiers, no inventory complexity. The attendee fills out the form, pays, and gets a confirmation.
What breaks down: Complex pricing rules, tax calculations, automatic refunds, and coupon management. Most form plugins handle these poorly or not at all.
Eventin takes a hybrid approach. It supports WooCommerce, Stripe, and PayPal natively, with automatic PDF ticket generation and QR codes for check-in after purchase.
WooCommerce as a Registration Backend
For events with multiple ticket tiers, early bird pricing, group discounts, and tax requirements, WooCommerce is the better foundation. Each ticket type becomes a WooCommerce product. Inventory management, coupon codes, and order tracking all work through the existing store system.
| Integration | Best For | Payment Gateways |
|---|---|---|
| WPForms + Stripe | Simple paid events, single ticket type | Stripe, PayPal, Square |
| Event Tickets Plus + WooCommerce | Multi-tier conferences, complex pricing | All WooCommerce gateways |
| FooEvents for WooCommerce | Ticketed events needing barcodes, PDF tickets | All WooCommerce gateways |
| WooCommerce Box Office | Events requiring custom attendee fields per ticket | All WooCommerce gateways |
WooCommerce Box Office and FooEvents both turn WooCommerce into a full event ticketing system. PDF tickets, barcode scanning, attendee lists per order. If your site already runs WooCommerce for other products, this is the path of least resistance.
Managing Ticket Limits and Sold-Out States
Every event plugin handles capacity differently. Event Tickets uses a stock countdown that shows remaining tickets on the event page. WPForms doesn’t have native stock tracking, so you’d need to manually close the form or use an entry limit setting.
EventsAir data suggests in-person events typically see 60-80% attendance from registrations. So if your venue holds 200, selling 250 tickets with the expectation of no-shows is common practice. But your form needs to reflect the actual ticket limit you set, not the venue capacity.
Confirmation Emails and Attendee Communication
The registration form is half the job. What happens after submission determines whether people actually show up.
Contrast data from 2025 shows that only 31% of companies send more than one reminder email to registrants. Those that implement a three-step reminder sequence (day before, one hour before, five minutes before) see 27% higher attendance.
Auto-Confirmation Emails
Every form plugin sends these by default. WPForms, Gravity Forms, Event Tickets, Eventin. The confirmation email fires the moment someone submits the form. But the default template is usually bare. A subject line, a “thank you” message, and nothing else.
Customize it. Include the event name, date, time, venue address, a calendar link (Google Calendar, Outlook, iCal), and any preparation instructions.
If you’re using WPForms, go to Settings > Notifications to add smart tags that pull in the attendee’s name and selected ticket type. Your WordPress email settings matter here too. Default WordPress email delivery through wpmail() often lands in spam. Use an SMTP plugin like WP Mail SMTP to route through a real email service.
Pre-Event Reminder Sequences
Most WordPress form plugins don’t handle drip email sequences. You need an integration with Mailchimp, FluentCRM, or a similar tool.
Connect your registration form to your email platform using Zapier or a native integration. Then build a simple automation:
- Confirmation email immediately after registration
- Event details reminder one week before
- Day-before reminder with logistics (parking, directions, schedule)
- Morning-of reminder with a direct link or QR code
GoToWebinar data shows 57% of registrations come from email marketing. Email isn’t just for reminders. It’s the primary channel driving registrations in the first place.
Handling Cancellations and Waitlists
This is where WordPress event registration gets messy. Most form plugins have no built-in cancellation flow. The attendee emails you, you manually refund through Stripe or PayPal, and then you update your attendee list.
Event Tickets Plus with WooCommerce handles refunds more cleanly since orders live in WooCommerce’s system. Automatic waitlist management, though, requires a dedicated plugin like Event Espresso or a custom solution.
If cancellations are a regular issue for your events (and they will be), build a cancellation link into your confirmation email. Even a simple Google Form that captures the name and email of the person canceling saves you time.
Managing and Exporting Registration Data
Collecting attendee data is the easy part. Doing something useful with it after the event, that’s where most organizers fall short.
A 2020 survey of companies managing roughly 20,000 annual online events found that 45% used registration and attendance numbers as their primary measure of event success (Cvent). Only 24.9% looked at attendee satisfaction. The data you collect through your registration form feeds directly into both measurements.
Viewing Registrations in the WordPress Dashboard
WPForms: Go to WPForms > Entries. Each form submission appears as a row with all field data. You can star, mark as read, or add notes to individual entries.
Event Tickets: Attendee data lives under Events > Attendees. Filter by event, ticket type, or check-in status.
Gravity Forms: Entries are stored under Forms > Entries with full search and filtering. The built-in entry detail view shows each submission with all meta data.
Exporting Attendee Lists
Every major form plugin exports to CSV. That covers Excel, Google Sheets, and most CRM imports.
WPForms Pro and Gravity Forms both offer selective field export, so you can pull just names and emails for your check-in list, or the full dataset for post-event analysis. Event Tickets generates sales and attendee reports directly from the WordPress dashboard.
For post event survey questions, you’ll want the attendee email list segmented by ticket type. Sending a generic feedback request to everyone works, but you’ll get better responses if you tailor the questions. VIP attendees and general admission attendees had different experiences.
Syncing Data With External Tools
| Tool | Sync Method | Best For |
|---|---|---|
| Google Sheets | Zapier, native plugin add-on | Real-time shared attendee lists |
| HubSpot CRM | Zapier, WPForms add-on | Lead scoring and follow-up sequences |
| Salesforce | Zapier | Enterprise event tracking |
| Mailchimp | Native integration in most plugins | Post-event email campaigns |
Zapier is the glue for most of these connections. Every time someone submits your registration form, Zapier pushes the data to your CRM, spreadsheet, or email platform automatically.
For day-of check-in, some organizers generate QR codes from the registration data and email them to attendees. FooEvents and Event Tickets Plus both support QR code scanning through companion mobile apps. Faster than printed lists. Way fewer errors.
Common Mistakes With WordPress Event Registration Forms
You can build a technically perfect registration form and still lose attendees. These are the mistakes that cost registrations, cause data headaches, and make your event look unprofessional.
The Manifest found that 81% of people have abandoned at least one web form after starting to fill it out. Event registration forms are no exception.
Asking for Too Many Fields
Every extra field reduces your completion rate. Quicksprout data shows that reducing a form from four fields to three can boost conversions by almost 50%.
Collect what you need for the event to function: name, email, ticket type. Everything else (dietary restrictions, session preferences, t-shirt sizes) can go in a follow-up email after the person has committed. The initial form’s job is to get the registration, not to gather every possible data point.
If you do need more fields, break the form into steps. Marketers who use multi-step forms or single-step forms report that multi-step versions convert 86% higher than single-page forms, according to HubSpot.
Skipping Mobile Testing
Zuko Analytics data puts the desktop form completion rate at 47% versus 42% for mobile. And 22% of webinar registrations happen on phones (Contrast, 2025). That gap widens further if your form wasn’t built with mobile forms in mind.
Test every registration form on an actual phone before publishing. Not a browser resize. An actual phone. Tap through every field, fill out the payment section, submit. If anything feels clunky, fix it first.
No Confirmation or Redirect After Submission
If someone fills out your form, hits submit, and sees… nothing? They’ll assume it didn’t work. They’ll submit again. Or worse, leave and never come back.
Always set up a registration successful message or a redirect to a dedicated thank-you page. Include what happens next: “Check your email for a confirmation with event details.” WPForms, Gravity Forms, and Event Tickets all support both confirmation messages and page redirects. Use one.
Forgetting Ticket or Seat Limits
WPForms doesn’t track stock natively. If you’re using it for paid events with limited capacity, set an entry limit in the form settings (Settings > General > Limit Number of Entries). Otherwise, you’ll oversell.
Event Tickets has built-in stock tracking, but you still need to set it. The default isn’t “unlimited.” Actually, it is. Which is the problem.
Not Connecting the Form to an Email Tool
Explori research shows that post-event feedback surveys for conferences and corporate events achieve a 10-20% response rate. That number goes up significantly when you’ve maintained communication with attendees between registration and the event itself.
If your registration form doesn’t connect to Mailchimp, FluentCRM, or any email tool, you have no way to send reminders, no way to share updates, and no way to collect feedback survey questions after the event. The form becomes a dead end instead of the start of a relationship.
Even a basic Zapier connection that adds registrants to a Mailchimp list solves this. Set it up before you publish the form, not after your first event when you realize you have 200 email addresses trapped inside WordPress with no way to reach them.
FAQ on WordPress Event Registration Form
What is a WordPress event registration form?
It’s a front-end form on a WordPress site that collects attendee information for a specific event. Name, email, ticket selection, payment. It goes beyond a basic contact form by handling event-specific data like session preferences and capacity limits.
Which plugin is best for event registration in WordPress?
WPForms works well for simple paid or free events. The Events Calendar with Event Tickets Plus is better for multi-day conferences. Gravity Forms handles complex pricing logic. Your event type determines the right fit.
Can I accept payments through a WordPress registration form?
Yes. Most form builders connect to Stripe and PayPal directly. For advanced ticketing with tax calculations, coupon codes, and multiple payment gateways, use WooCommerce as the checkout backend with Event Tickets Plus or FooEvents.
How many fields should an event registration form have?
Five or fewer performs best. HubSpot data confirms this consistently. Collect the basics at registration (name, email, ticket type) and gather additional details like dietary needs through a follow-up email after the commitment is made.
Do I need a plugin to create a registration form?
No. You can build one with custom HTML and process submissions through PHP hooks in WordPress. But plugins like WPForms or Fluent Forms save significant time and include built-in payment integration, spam protection, and email notifications.
How do I prevent overbooking with a WordPress event form?
Event Tickets has built-in stock tracking with a ticket countdown. In WPForms, set an entry limit under Settings > General. Always configure your ticket capacity before publishing. The default in most plugins is unlimited, which causes problems.
Can I send confirmation emails after someone registers?
Every major WordPress form plugin sends automatic confirmation emails by default. Customize the template to include the event name, date, venue, and a calendar link. Use an SMTP plugin to avoid emails landing in spam folders.
How do I make my event registration form mobile-friendly?
Most WordPress form plugins like WPForms and Gravity Forms are responsive by default. Still, test on an actual phone before publishing. Tap through every field. Desktop previews don’t catch touch-target issues or keyboard overlap problems.
Can I export my attendee list from WordPress?
Yes. WPForms Pro, Gravity Forms, and Event Tickets all export to CSV. You can also sync data automatically to Google Sheets, HubSpot, or Mailchimp through Zapier. Most plugins support selective field export for targeted lists.
How do I add conditional logic to my registration form?
WPForms Pro and Gravity Forms both support conditional logic natively. Show or hide fields based on attendee selections. For example, display meal preference options only when someone picks a VIP ticket that includes catering.
Conclusion
A well-built WordPress event registration form does more than collect names. It handles ticket sales, manages attendee capacity, triggers confirmation emails, and feeds data into your CRM or email marketing platform.
The plugin you choose depends on what your event actually needs. WPForms for straightforward signups. Event Tickets Plus with WooCommerce for multi-tier conferences. Custom code when nothing else fits.
Keep your registration fields tight. Test on mobile before you publish. Connect to an email tool so registrants hear from you between signup and show time.
Don’t overthink it. Start with the simplest form that gets the job done, then add complexity only when the event demands it. Your attendees will thank you by actually completing the form.

