documentation-logo
Menu
  • Guides
  • Form Creation
  • General fields

How do I configure the website/URL field in IvyForms?

ON THIS PAGE

The Website/Url field is used to capture full web addresses from your users, such as links to their websites, portfolios, or social profiles. It provides built-in URL validation so you can collect properly formatted links and avoid most common typing mistakes. This article explains how the Website / URL field works and which settings you can configure in the form builder.


Front-end view of a Website or URL field in an IvyForms form.

Front-end appearance

Where can I find the Website or URL field in IvyForms?

You can add the Website / URL field from the General fields section in the left panel of the IvyForms builder. When you expand this section, all common input types are listed, and the Website / URL option appears alongside fields such as Text, Email, and Number. Click it once to insert it into your form, then select the field in the preview to access its settings.

IvyForms field list with the Website/URL field selected and other fields grayed out in the panel.

What settings can I configure for the Website or URL field?

After you select the Website / URL field in the preview area, the left sidebar switches to the Options view. From here, you can manage the field through three main sections: General, Advanced, and Smart logic. These tabs control how the field looks, how URLs are validated, and in which situations the field is displayed.


How do general settings work for the Website or URL field?


The General tab contains the key configuration options that define how the Website / URL field appears to users and how they interact with it. This is where you set the label, helper text, requirement status, and placeholder for the URL input.


General options tab for the Website or URL field in IvyForms showing label, description, required, read-only, placeholder, and CSS class settings.
 

  • Label – sets the text shown above or next to the URL input, for example “Website” or “Your homepage URL”.
  • Hide label – removes the label from the front-end so only the field and its description remain visible.
  • Description – adds a short instruction below the field, such as “Please enter a full URL including https://”.
  • Required – makes the Website / URL field mandatory, so users must provide a valid address before the form can be submitted.
  • Read-only – displays a URL that users can view but cannot change, useful when you want to show a fixed link.
  • Placeholder – shows example content inside the input, for instance “https://example.com”, to indicate the expected format.
  • CSS classes – lets you assign one or more custom class names, which you can target in your own stylesheets to adjust spacing, colors, or layout.


How do advanced settings work for the Website or URL field?


The Advanced tab offers additional controls over how the Website / URL field behaves and how it is presented in your form. Here you can limit the length of the entered URL, adjust label placement, prevent duplicate entries, and optionally display a prefix or suffix next to the field.


Advanced options tab for the Website or URL field in IvyForms showing maximum length, label position, no duplicates, prefix, and suffix settings.
 

  • Limit maximum length – sets a maximum number of characters that can be entered into the URL field, which helps avoid overly long or malformed links.
  • Label position – changes where the label appears relative to the input. You can keep the Default position or move it to the Top, Left, or Right to better fit your form layout.
  • No duplicates – prevents users from submitting the same URL more than once, which can be useful when each entry should contain a unique website address.
  • Prefix – displays static text directly before the Website / URL input on the front-end, for example “https://” or “www.”, to guide users toward a specific format.
  • Suffix – shows fixed text immediately after the input, such as “.com” or a short hint, to visually indicate how the final URL is expected to look.


How can I use smart logic with the Website or URL field?

Smart Logic is available only in the Pro version of IvyForms.


The Smart logic settings allow you to show the Website / URL field only when certain conditions are met. By default, smart logic is disabled and the field is always visible. When you enable it, you can create rules that determine when the field should appear based on other answers in the form.


Smart logic settings for the Website or URL field in IvyForms showing conditional match options and rule configuration.
 

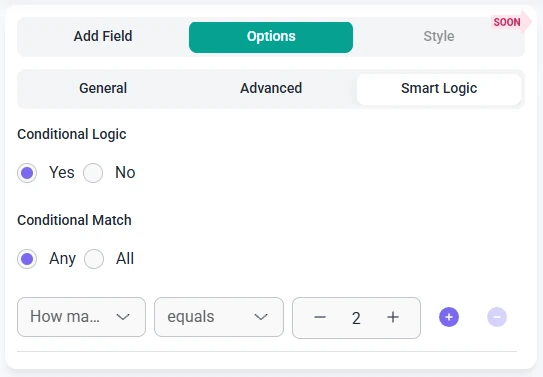
After smart logic is turned on, the Conditional match option becomes available and lets you decide how the rules should be evaluated:

  • Any – the Website / URL field is displayed if at least one of the configured conditions is true.
  • All – the Website / URL field is displayed only when every defined condition is satisfied at the same time.


These conditions rely on other fields in the same form. For example, you can show the Website / URL field only when a user selects “Business owner” in a Radio Button field or activates a checkbox for “Share my website”. This way, you only request a URL from users when it is relevant to their chosen options, which helps keep your forms clear and focused.